Configure customer in Codat
Create a company and its connection that form the structure required to execute the expense sync process
Overview
When implementing your Sync for Expenses solution, you need to create your SMB customer as a
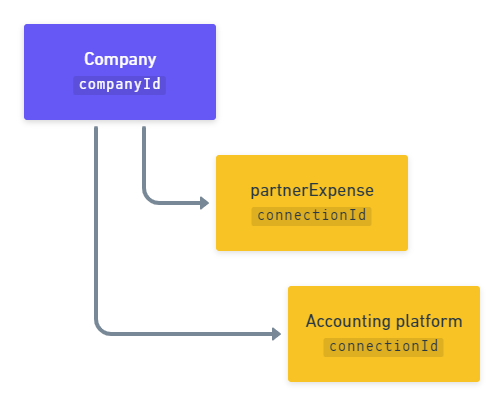
Next, you will connect the company to a data source via one of our integrations. With Sync for Expenses, each company will have two data connections: one to the SMB's accounting platform, and another one - to the partner expense integration, i.e. your application.
Remember to authenticate when making calls to our API. Navigate to Developers > API keys in the Portal to pick up your authorization header.
Create a company
Within Sync for Expenses, a company represents your SMB customer that manages their expenses using your application. To create it, use our Create company endpoint. It returns a JSON response containing the company id. You will use this id to establish a connection to an accounting platform.
- HTTP
Create accounting connection
Next, use the Create connection endpoint to connect the company to an accounting data source via one of our integrations. This will allow you to synchronize data with that source. In the request body, specify a platformKey of the accounting platform you're looking to connect.
| Accounting platform | platformKey |
|---|---|
| Oracle NetSuite | akxx |
| QuickBooks Desktop | pqsw |
| QuickBooks Online | qhyg |
| Sage Intacct | knfz |
| Xero | gbol |
As an example, let's create a QuickBooks Online (QBO) connection. In response, the endpoint returns a dataConnection object with a PendingAuth status and a linkUrl. Direct your customer to the linkUrl to initiate our Link auth flow and enable them to authorize this connection.
- HTTP
Request
POST /companies/{companyId}/connections
{
    "platformKey": "qhyg"
}
Response
 {
  "id": "7baba7cc-4ae0-48fd-a617-98d55a6fc008",
  "integrationId": "6b113e06-e818-45d7-977b-8e6bb3d01269",
  "sourceId": "56e6575a-3f1f-4918-b009-f7535555f0d6",
  "platformName": "QuickBooks Online",
  "linkUrl": "https://link-api.codat.io/companies/{companyId}/connections/{connectionId}/start?otp=742271",
  "status": "PendingAuth",
  "created": "2022-09-01T10:21:57.0807447Z",
  "sourceType": "Accounting"
}
Create partner expense connection
Once your customer has authorized access to their accounting platform, you need to create another connection for their company for the partner expense integration.
Use our Create partner expense connection to link the company to your application. This connection is created with the Linked status, so you don't need to do anything else to authorize it.
Deauthorize a connection
If your customer wants to revoke their approval and sever the connection to their accounting package, use the Unlink connection endpoint.
You can learn more about connection management best practices and see how you can provide this functionality in your app's UI.
PATCH /companies/{companyId}/connections/{connectionId}
 {
 "status": "Unlinked"
 }
You have created the structure of key objects required by Codat's Sync for Expenses: a company and its connections to an accounting data source and your partner expense integration.
Next, learn how to configure the company to associate the expenses with correct accounts, suppliers, and customers and enable your customers to indicate their preferred expense mapping options.