First steps with Codat
A practical introduction to Codat's Portal and API
You need an account and its API key to start with Codat. You can sign up for an account for free, or learn more about creating one.
In this guide...
With Codat, you can more easily build integrated financial products for SMBs.
Set up your customers by adding them as
Finally, review and analyze the data relevant to your use case, which Codat pulls from your SMB customers' data sources.
This guide is aimed at developers and non-developers alike. In three easy steps, you will create a company, link it to Codat's sandbox, and review its financial data to get acquainted with Codat's solution.
Your free account comes equipped with an example company. Navigate to Companies in the Codat Portal and click the demo company to examine data relevant for your use case.
You can perform each step in the Codat Portal or using our API.

Developer prerequisites
If you are a developer and want to work with Codat using our API reference or by making calls to our API in code, you first need to authenticate.
Authenticate with Codat's API
Authorization headers can only be viewed and copied by users with Administrator or Developer roles.
Codat uses API keys, Base64 encoded within an authorization header, to control access to the API. To copy your authorization header, navigate to Developers > API keys in the Codat Portal.
Then, replace {basicAuthHeader} in the code snippets below.
- C#
- TypeScript
- Python
- Go
Installation
dotnet add package Codat.Platform
Authentication
  using CodatPlatform;
  using CodatPlatform.Models.Shared;

  var codatPlatform = new CodatPlatformSDK(
      security: new Security() {
          AuthHeader = "{basicAuthHeader}",
      }
  );
Installation
npm add @codat/platform
or
yarn add @codat/platform
Authentication
  import { CodatPlatform } from "@codat/platform";

  const codatCommon = new CodatPlatform({
    security: {
      authHeader: '{basicAuthHeader}',
    },
  });
You can read more about authentication at Codat, or proceed to create your first company.
1. Create a company
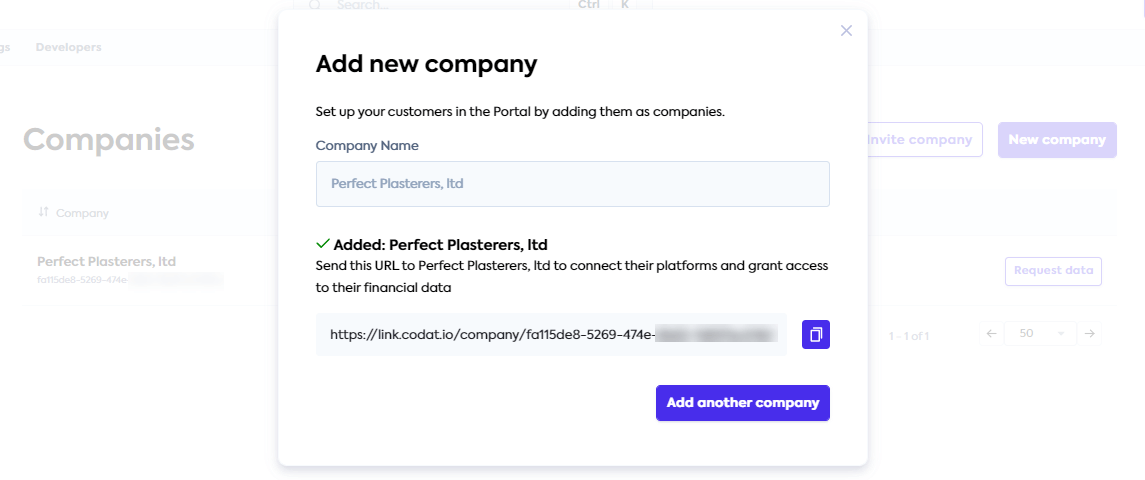
Set up your SMB customer by adding them as a company. In the Codat Portal, navigate to Companies > New company. The "Add new company" dialog appears.
Enter the name you want to give the entity that represents your SMB customer and click Add. A success message pops up, providing a connection URL. Normally, you would share this URL with your customer so they can authorize a connection with Codat.
Copy this URL for use in the next step. Note that this URL can be accessed again at any time in the future.
Create a company using Codat's API
To create a company in Codat, use the POST /companies endpoint with a request body containing the name of the company. It does not have to be unique and serves to identify your customer in Codat.
- C#
- TypeScript
- Python
- Go
- cURL
using CodatPlatform.Models.Shared;

var res = await codatPlatform.Companies.CreateAsync(new CompanyRequestBody() {
    Description = "Requested early access to the new financing scheme.",
    Name = "Bank of Dave",
});

if(res.Company != null) {
  logger.LogInformation('{CompanyId} {CompanyName}', res.Company.Id, res.Company.Name)
}
  import { CreateCompanyResponse } from "@codat/platform/dist/sdk/models/operations";

  codatPlatform.companies.create({
    description: "Requested early access to the new financing scheme.",
    name: "Bank of Dave",
  }).then((res: CreateCompanyResponse) => {
    if (res.statusCode == 200) {
      console.log(res.company.id, res.company.name)
    }
  });
  req = shared.CompanyRequestBody(
    description='Requested early access to the new financing scheme.',
    name='Bank of Dave',
  )

  res = codat_platform.companies.create(req)

  if res.company is not None:
    print(res.company.id, res.company.name)
import(
  "github.com/codatio/client-sdk-go/platform/pkg/models/shared"
  "fmt"
)

ctx := context.Background()

res, err := codatPlatform.Companies.Create(ctx, shared.CompanyRequestBody{
  Description: codatplatform.String("Requested early access to the new financing scheme."),
  Name: "Bank of Dave",
})

if err != nil {
  log.Fatal(err)
}

if res.Company != nil {
    fmt.Println("%s %s", res.Company.Id, res.Company.Name)
}
  curl --request POST \
      --url "https://api.codat.io/companies" \
      --header "Authorization: $CODAT_AUTH_HEADER" \
      --header "accept: application/json" \
      --header "content-type: application/json" \
      --data '{
              "name": "SMB company name",
              "description": "Any additional information about the company"
      }
The endpoint returns a JSON response, confirming the unique id of the company and a redirect URL used to establish a connection with a data source.
Retain the id and redirect URL for use in the next steps.
You can also use the Create company endpoint in our API reference to try this out.
2. Create a sandbox data connection
Next, connect your company to our Sandbox to make use of mock accounting, commerce, and banking data. It gives you access to many of the data types and operations supported by Codat.
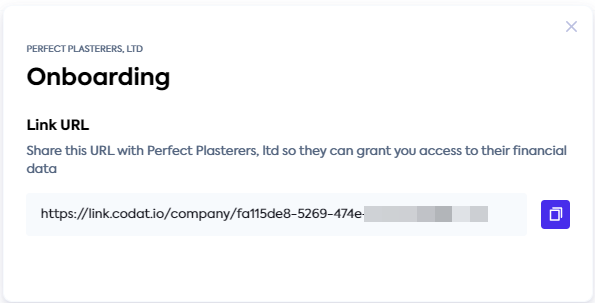
If you have retained the connection URL from the previous step, simply open it in a new browser tab.
If you need to view the URL again, navigate to Companies in the Codat Portal. Next, find the company you created for the customer, and click Request data next to the company name. Copy the Link URL and open it in the new tab.
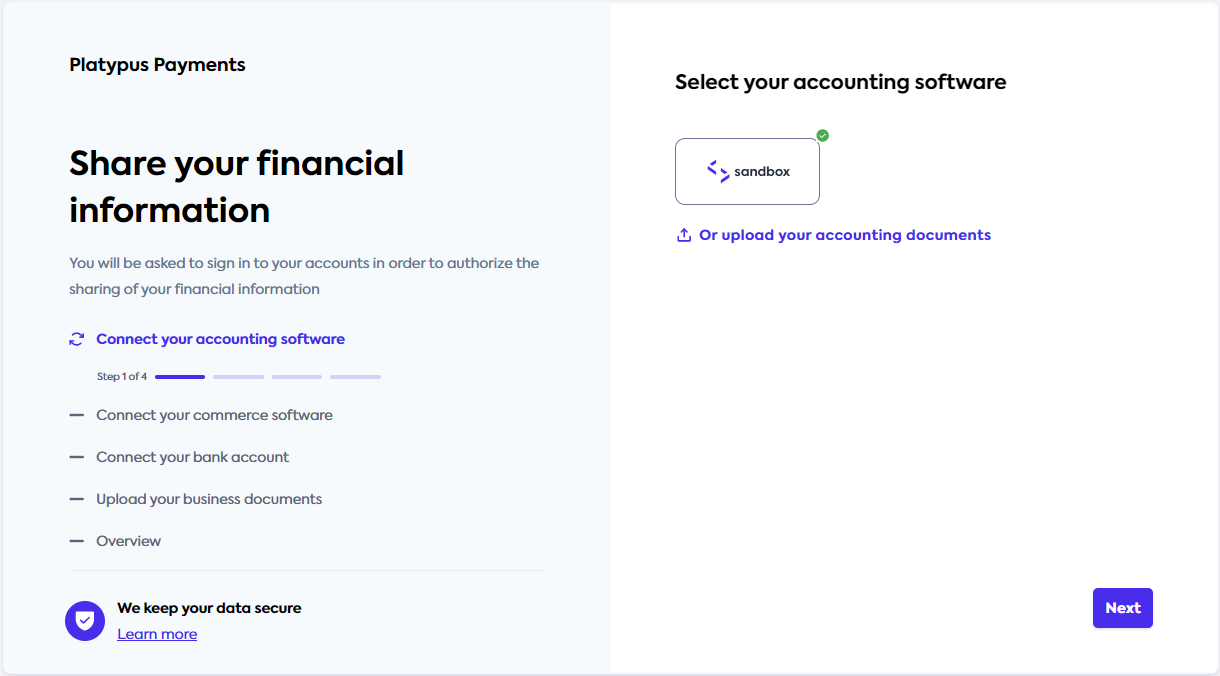
This opens Codat's authorization flow built using our Link feature.
Follow the flow and select Codat Sandbox as your source of accounting, commerce, and banking data. You don't need to enter any credentials. Skip the step of uploading business documents.
When all Sandbox connections are complete, you'll see a confirmation message. You can now close the tab. Meanwhile, Codat pulls the Sandbox data via the established connection.
Link to Sandbox using Codat's API
Pick up the redirect URL returned in the response body of the company creation step and open it in a new browser window.
Follow the flow to connect to the Codat Sandbox as your source of accounting, commerce, and banking data. You don't need to enter any credentials.
Once the flow is complete, you can verify the company's status under the View a single company endpoint.
Remember to replace {companyId} with your company id obtained previously.
- C#
- TypeScript
- Python
- Go
- cURL
using CodatPlatform.Models.Shared;
using CodatPlatform.Models.Operations;
using System.Net;

var res = await sdk.Companies.GetAsync(new GetCompanyRequest() {
  CompanyId = "{companyId}",
});

if res.statusCode == (int)HttpStatusCode.OK {
  logger.LogInformation("{Redirect}", res.Company.Redirect)
}
  import { GetCompanyResponse } from "@codat/common/dist/sdk/models/operations";

  codatCommon.companies.get({
    companyId: "{companyId}",
  }).then((res: GetCompanyResponse) => {
    if (res.statusCode == 200) {
      console.log(res.company.redirect)
    }
  });
  req = operations.GetCompanyRequest(
    company_id='{companyId}',
  )

  res = codat_common.companies.get(req)

  if res.company is not None:
    print(res.company.redirect)
import(
  "github.com/codatio/client-sdk-go/common/pkg/models/shared"
  "fmt"
)

ctx := context.Background()

res, err := s.Companies.Get(ctx, operations.GetCompanyRequest{
      CompanyID: "{companyId}",
  })

if err != nil {
  log.Fatal(err)
}

if res.Company != nil {
    fmt.Println("%s",res.Company.Redirect)
}
  curl --request GET \
      --url "https://api.codat.io/companies/{companyId}" \
      --header "Authorization: $CODAT_AUTH_HEADER" \
      --header "accept: application/json"
In the JSON response, you can see that the the status of data connections changed to linked.
On first connection, Codat pulls data from the data source immediately. You can also use the Get company data status endpoint to confirm the sync was successful.
Now you are ready to examine the company's financial data and view the datasets relevant to your use case.
3. Examine company data for your use case
Navigate back to the Companies page in the Codat Portal. You will see your newly created company, along with the connections to the Accounting, Commerce, and Banking Sandboxes that were connected in the previous step.

Now, click the company name and use the side menu to navigate to Products. You can review the data pulled by Codat's accounting, banking, and commerce APIs. Switch between the data types using the dropdown on the right, and view and export data as needed for your use case.
Here, we review the SMB customer's invoice data pulled from the accounting Sandbox. This data helps with business forecasts and cash flow management based on sales changes over time, average payment timelines, and amounts related to the invoices.
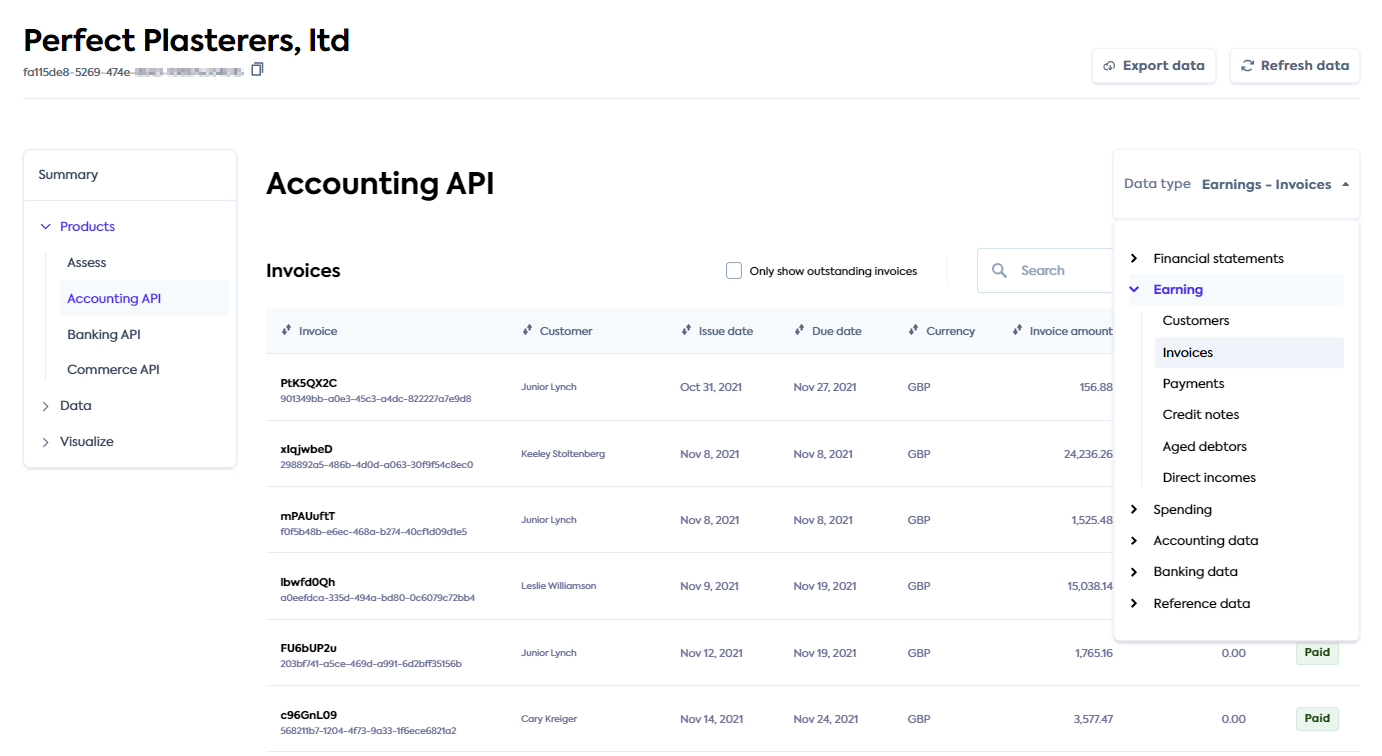
Developers can also use the Portal to review how Codat polled for a specific data type and the results it received at the bottom of each data type page.
Access company data using Codat's API
Codat provides various endpoints for you to query each of the supported data types easily.
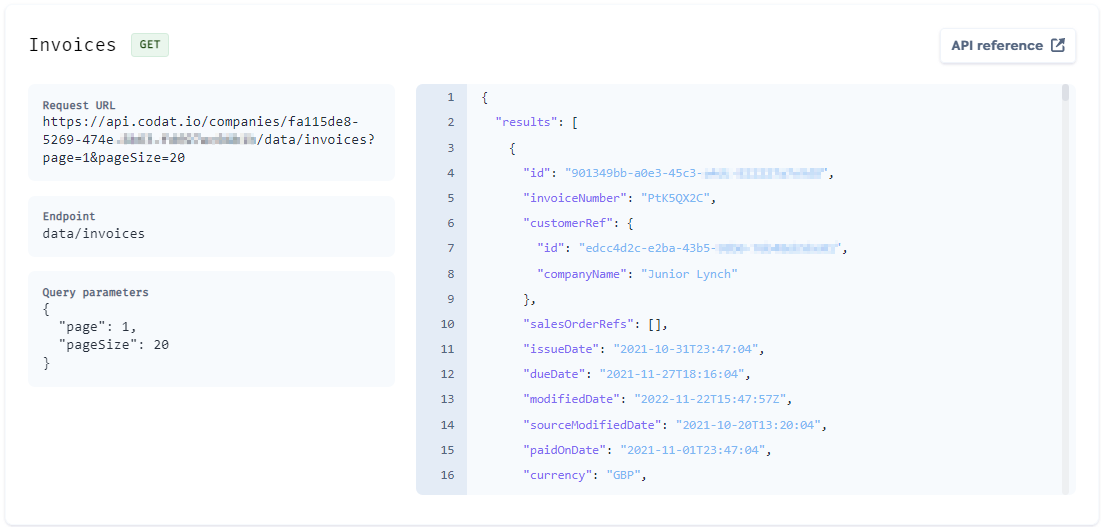
For example, to query invoices, use the All invoices endpoint. You can perform filtering on the response data using querying. In this guide, we are using page and pageSize parameters to pull ten invoices for the company we created earlier.
Remember to replace {companyId} with your company id obtained previously.
- C#
- TypeScript
- Python
- Go
- cURL
Installation
dotnet add package Codat.Lending
Usage
using CodatLending;
using CodatLending.Models.Shared;
using CodatLending.Models.Operations;

var codatLending = new CodatLendingSDK(
  security: new Security() {
        AuthHeader = "{basicAuthHeader}",
    }
);

var res = await codatLending.AccountsReceivable.Invoices.ListAsync(new ListAccountingInvoicesRequest() {
    CompanyId = "8a210b68-6988-11ed-a1eb-0242ac120002",
});

if(res.StatusCode == (int)HttpStatusCode.OK){
  logger.LogInformation(res.invoices.results[0].Id)
}
Installation
npm add @codat/lending
or
yarn add @codat/lending
Usage
  import { CodatLending } from "@codat/lending";
  import { ListInvoicesResponse } from "@codat/lending/dist/sdk/models/operations";

  const codatLending = new CodatLending({
    security: {
      authHeader: "{basicAuthHeader}",
    },
  });

  codatLending.accountsReceivable.invoices.list({
    companyId: "{companyId}"
  }).then((res: ListInvoicesResponse) => {
    if (res.statusCode == 200) {
      console.log(res.accounting_invoices.results[0].id)
    }
  });
Installation
pip install codat-lending
Usage
  import codatlending
  from codatlending.models import operations

  codat_lending = codatlending.CodatLending(
      security=shared.Security(
          auth_header="{basicAuthHeader}",
      ),
  )

  req = operations.ListInvoicesRequest(company_id='{companyId}')

  res = codat_lending.accounts_receivable.invoices.list(req)

  if res.invoices is not None:
    print(res.accounting_invoices.results[0].id)
Installation
go get github.com/codatio/client-sdk-go/lending
Usage
package main

import(
  "context"
  "log"
  "github.com/codatio/client-sdk-go/lending"
  "github.com/codatio/client-sdk-go/lending/pkg/models/operations"
  "fmt"
)

func main() {
    codatLending := codatlending.New(
        codatlending.WithSecurity(shared.Security{
            AuthHeader: "{basicAuthHeader}",
        }),
    )

    ctx := context.Background()
    res, err := codatLending.AccountsReceivable.Invoices.List(ctx, operations.ListInvoicesRequest{
        CompanyID: "{companyId}"
    })

    if err != nil {
        log.Fatal(err)
    }

    if res.Invoices != nil {
      fmt.Println("%s ",res.AccountingInvoices.Results[0].id)
    }
}
  curl --request GET \
      --url "https://api.codat.io/companies/{companyId}/data/invoices?page=1&pageSize=10" \
      --header "Authorization: {basicAuthHeader}" \
      --header "accept: application/json"
In the JSON response, the API provides ten detailed invoices as a result.
You can also use the Portal to review how Codat polled for a specific data type and the results it received at the bottom of each data type page.
You have now:
- created a Codat company that represents your small business customer,
- authorized sandbox connections to pull various financial data, and
- reviewed the data and its visual representation, relating it to your use case.
Next steps
Want to pull and view data from a different platform?
Codat enables you to connect to over 30 different accounting, banking, and commerce platforms. You can choose to pull data from a platform most relevant to you.
Navigate to Settings > Integrations in the Portal. Choose the integration type, find the platform you need, and set it up. Once you've enabled the platform, create a data connection to it, as you have done with the Sandbox earlier. You will need valid credentials for the platform you are trying to link.
You can review our detailed instructions for setting up integrations like Xero, QuickBooks Online, PayPal, Plaid, and many more.
Curious about what other data Codat can provide you with?
Codat pulls a variety of data types from the source platforms, making it easy to suit the needs of your use case.
With our accounting integrations, you can pull financial statements, earning and spending detail, journal entries, tax details, and many more. Our banking integrations provide you with banking transactions, accounts, and account balances. Finally, our commerce integrations can show you details of orders, customers, payments, products, and others.
Keen to customize the look and feel of the auth flow?
Colors, logos, and icons of Codat's authorization flow can be changed for a bespoke experience. Navigate to Settings > Auth flow > Branding in the Codat Portal and adjust to fit the flow to your brand's palette.
Then, use the Link URL of the company you created earlier to review your customer's experience with the flow. You can even take the customization one step further and amend the accompanying text and behaviors.
Want to migrate your existing integration to Codat?
If you already have an OAuth application with one of our supported integrations, you can seamlessly migrate your customers' connections — without your customers needing to reconnect.
You can choose a self-service token migration, or engage us for a managed migration. Choose the option that best suits your use case.