Install the QuickBooks Desktop connector on Right Networks
Learn how to install our QuickBooks Desktop connector on Right Networks hosted instances of QBD.
Please note, support for installing the QBD connector in Right Networks hosted environments is in beta testing. If you're interested in using this functionality, please contact your Account Manager or Account Executive to find out more and gain access.
Your SMB customers can install our QuickBooks Desktop connector on a hosted instance of QuickBooks Desktop (QBD) provided by Right Networks. In a hosted instance, users access QBD through a virtual desktop hosted in the cloud rather than by installing the program locally.
Prerequisites for installation
Your organization must first be approved as a Right Networks independent software vendor (ISV). To request this, contact [email protected] and state that you are working with Codat.
To meet Right Networks requirements you must meet one of the below criteria:
- A single Right Networks account with 10 active hosted desktop users that use the app.
- Several Right Networks accounts with a combined total of 25 active hosted desktop users that would use the app.
Your SMB customers, who will share their data through the integration, must use one of the supported hosted products in order to install the connector.
Setup overview
As a Codat client, you need to complete the following tasks to enable your SMB customers to install our QBD connector on Right Networks hosted instances.
- Check your SMB customers are using a supported hosted product.
- Customize branding, upload installation files, and test your implementation.
- Enable the QBD integration in the Codat Portal.
- If you're using Link, enable the Right Networks installation option in the Link flow.
Instead of using Link, you can provide your SMB customers with separate instructions for installing and licensing the QBD connector in their Right Networks hosted environment.
Next, your SMB customers must do the following:
- Connect to QBD and request connector installation.
- Connect to QuickBooks Desktop on Right Networks.
- Open QBD on Right Networks.
Supported hosted products
Your SMB customers must use one of the following supported products:
| Supported product | Provider |
|---|---|
| QuickBooks Application Cloud | Right Networks |
| QuickBooks Enterprise with cloud access. Deluxe tier only. | Intuit |
Customize branding, upload app installation files, and test your implementation
If Right Networks approve your request to become a registered ISV, they'll provide instructions for uploading your connector app to a secure site. Your connector app files must be approved by Right Networks before your implementation is made live.
- Sign in to the Codat Portal.
- Go to the Organization settings area.
- Add your organization name, and upload a logo and an ICO file to use as the QBD connector icon.
- Download your connector app installation files from the Codat Portal and provide them to Right Networks for evaluation.
- In the navigation bar, select Settings > Integrations > Accounting.
- Click Manage next to the QuickBooks Desktop integration.
- In the Right Networks / QuickBooks enterprise with cloud access section, click Download. The installation files are downloaded to your computer as a ZIP file.
- Upload the ZIP file to the secure site as advised by Right Networks.
- Right Networks evaluate the connector app files.
- Right Networks provide you with access to a test account in which a QBD instance and our QBD connector are both installed. Use the test account to validate that the implementation works as expected. You'll need to create a test company in the Codat Portal.
- Inform Right Networks that you want to proceed with the implementation.
- Right Networks set the implementation to Live.
Optional: Enable Right Networks installation for your SMB customers
If you're using Link, you can enable the Right Networks installation path in the Codat Link flow. This lets your SMB customers choose whether to install the QBD connector locally, or in their Right Networks hosted environment.
-
Sign in to the Codat Portal.
-
In the navigation bar, select Settings > Integrations > Accounting.
-
Click Manage next to the QuickBooks Desktop integration.
-
Select the checkbox named Enable your customer users to see the Right Networks install guide in the QBD connector download UI.
Enabling the checkboxThis checkbox must be enabled by your Solutions Consultant.
Enable the QBD integration
In the Codat Portal:
- In the navigation bar, select Settings > Integrations > Accounting.
- Use the toggle to enable the QuickBooks Desktop integration.
You can now send Link URLs to your SMB customers.
SMB customer: Requests connector installation
In the Link site, your SMB customer requests that Right Networks install the Codat connector App to their cloud instance.
Your SMB customer does the following:
-
Opens the Link URL.
-
In Link, they select the Intuit QuickBooks Desktop / Pro tile.

-
On the How do you use QuickBooks Desktop? step, they select the second option:
I'm accessing QuickBooks Desktop hosted in the cloud by Right Networks, including QuickBooks Desktop Enterprise with cloud access.
-
The Connection steps dialog is displayed, containing instructions for your SMB customers to request installation of the connector App and access their license key.

-
Finally, they copy their license key from the License key box to use in the next procedure.
When the connector App is installed, a shortcut named QuickBooksDesktopUI.exe appears on the SMB customer's cloud instance Start menu. They can now connect to QBD by following the next procedure.
SMB customer: Connects to QuickBooks Desktop on Right Networks
Next, your SMB customer does the following:
-
Opens the QuickBooksDesktopUI.exe application from their Start menu.
noteIf the app doesn't open, they can try opening it from the Windows system tray.
-
In the connector app setup wizard, clicks Add new connection.
-
Enters their license key from Link into the License Key box (see step 5 of the previous task), then clicks Next.
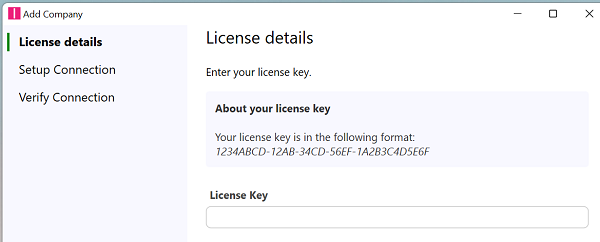
- To finish installing the connector, they must follow the steps in the Setup Connection and Verify Connection steps of the wizard. For more details, see procedures 3–5 in Install the QuickBooks Desktop connector.
To verify the connector is running, your SMB customer should look for the QuickBooks Connector app in the Windows system tray. The app uses your organization's logo.
SMB customer: Opens QBD on Right Networks
Next, your SMB customer opens the QuickBooks Desktop application.
The QuickBooks Desktop connector is now ready to use.