Install the QuickBooks Desktop connector
Guide for SMB users to install our QuickBooks Desktop on-premise connector.
Your customer needs to be running a supported version of QuickBooks Desktop Pro, Enterprise or Professional. QuickBooks for Mac is not supported.
Check operating system requirementsThe connector works on Windows 10, Windows 11, and Windows Server 2019, and may not work correctly on earlier versions of Windows. Your customer will need administrator permissions on your computer to complete the installation.
Consider antivirus and firewallThe user's local antivirus or firewall settings may prevent the download and running of the connector. To resolve, you need to allowlist the connector.
To install the QuickBooks Desktop connector, the user who is connecting their companyCompany In Codat, a company represents your customer's business entity. Companies can have multiple connections to different data sources. data must complete the following tasks:
The QuickBooks Desktop connector must be run on the same computer as the QuickBooks Desktop application. Advise your client to install the connector on the computer they normally use when working with QuickBooks Desktop.
Before they start the linking process, the user must open QuickBooks Desktop and log in to the companyCompany In Codat, a company represents your customer's business entity. Companies can have multiple connections to different data sources. they want to linkLink The authorization flow that allows end users to connect their accounting, banking, or commerce platforms to your application via Codat..
1. Download and install the connector
If the user selects "QuickBooks Desktop app" on the initial LinkLink The authorization flow that allows end users to connect their accounting, banking, or commerce platforms to your application via Codat. screen, they will be directed to download the web connector from a Codat LinkLink The authorization flow that allows end users to connect their accounting, banking, or commerce platforms to your application via Codat. URL.
If they select "QuickBooks Enterprise Cloud" or "Rightworks", they will immediately proceed to the next step as these hosted environments already have the web connector installed.
We package Intuit's web connector with our auto-run tool in a QuickBooksDesktopConnector.exe file. This bundle is signed using an extended validation certificate.
Administrator privileges (admin rights) are required to run the connector. When you add a new companyCompany In Codat, a company represents your customer's business entity. Companies can have multiple connections to different data sources., a user with admin rights needs to run the installer, which will display the following dialog:
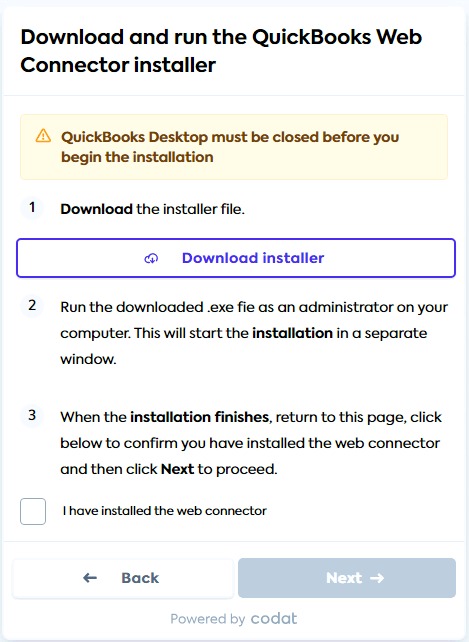
When your user runs the QuickBooksDesktopConnector.exe, it will launch the "QBWebConnector - InstallShield Wizard" to take them through the installation steps. It will be a fresh install or an update to the latest version if the web connector is already present on the machine.
If the SMBSMB The primary customer segment that Codat helps businesses serve, typically companies with annual revenues under $500 million. user isn't a Windows administrator on their own system, a different administrator must approve the installation and run QuickBooks Desktop using the Run as Administrator option. This applies both during the initial linkLink The authorization flow that allows end users to connect their accounting, banking, or commerce platforms to your application via Codat. and when adding companies to an existing connector. When installed in this way, the connector is only able to syncSync The process of fetching the latest data from a connected data source. Syncs can be triggered manually or run automatically on a schedule. data while QuickBooks Desktop is closed.
2. Run the configuration file to authorize access to QuickBooks
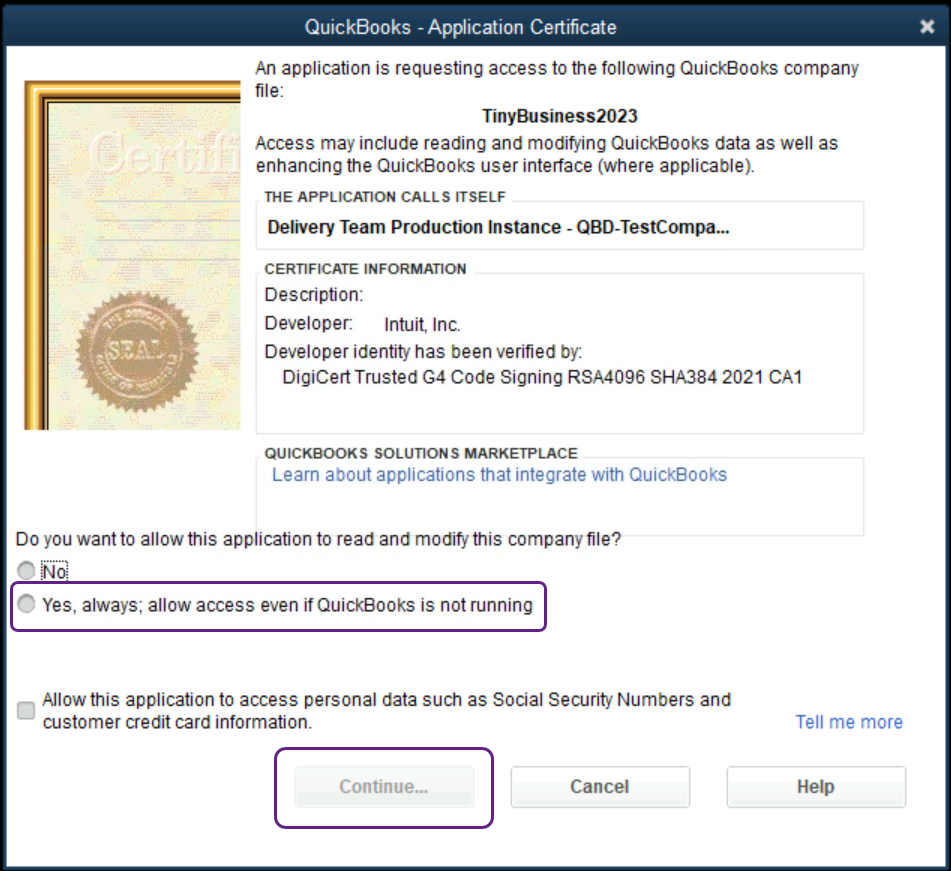
Next, the user downloads the configuration file and runs it to create a connectionConnection A link between a Codat company and a data source (like an accounting platform). Each connection represents authorized access to pull or push data from that platform. to their QBD companyCompany In Codat, a company represents your customer's business entity. Companies can have multiple connections to different data sources. via the web connector. The configuration file will detect and linkLink The authorization flow that allows end users to connect their accounting, banking, or commerce platforms to your application via Codat. to the open QBD companyCompany In Codat, a company represents your customer's business entity. Companies can have multiple connections to different data sources.. QuickBooks Desktop will then display a prompt requesting to allow the application to read and modify the QuickBooks companyCompany In Codat, a company represents your customer's business entity. Companies can have multiple connections to different data sources. file.
Options might vary between QuickBooks versions, but are similar to:
- No
- Yes, always; allow access even if QuickBooks is not running
The user should select Yes, always; allow access even if QuickBooks is not running to enable the connector to work.
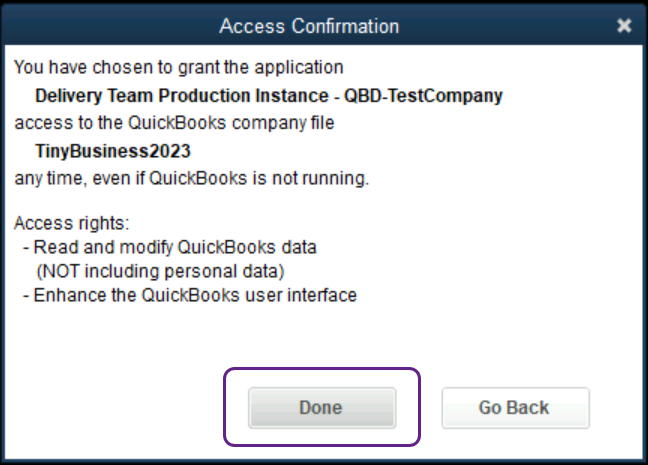
They should check the details in the Access Confirmation dialog, and then click Done.
3. Authenticate the connector
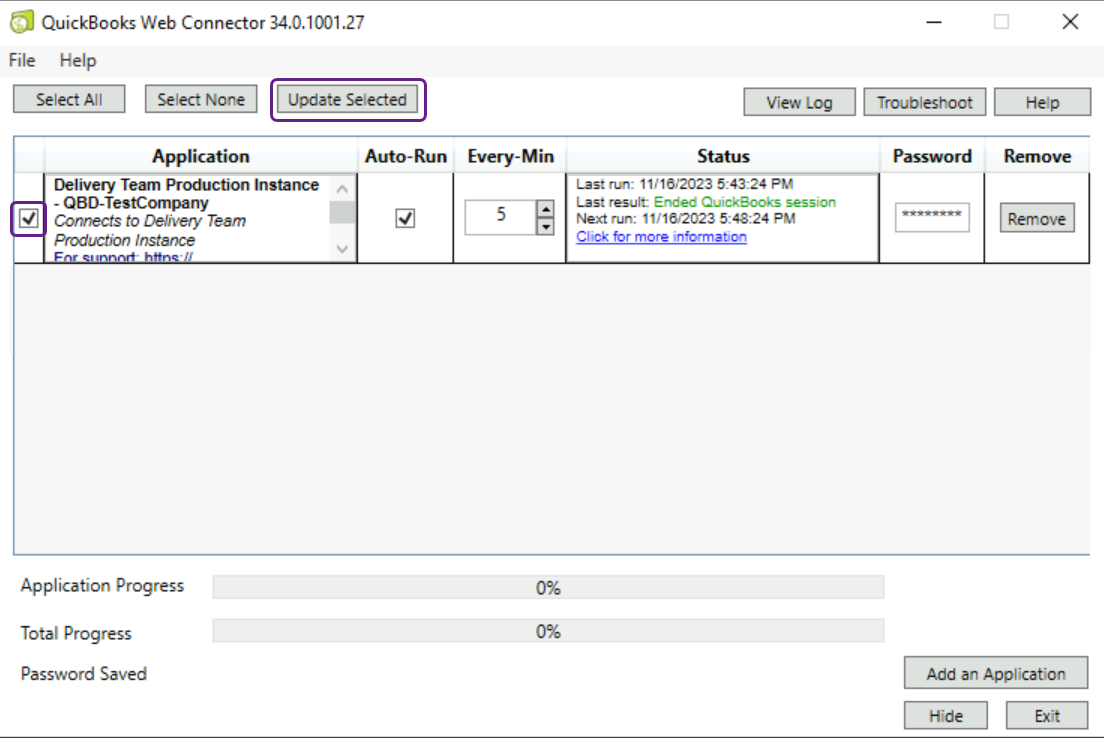
Once the user allows the connector access to the open QuickBooks Desktop companyCompany In Codat, a company represents your customer's business entity. Companies can have multiple connections to different data sources., they will see a new connectionConnection A link between a Codat company and a data source (like an accounting platform). Each connection represents authorized access to pull or push data from that platform. appear in the web connector. The user must then select the connectionConnection A link between a Codat company and a data source (like an accounting platform). Each connection represents authorized access to pull or push data from that platform. using the checkbox.
A password pop-up appears. They should enter the copied password in the pop-up, click OK and confirm to save when prompted.
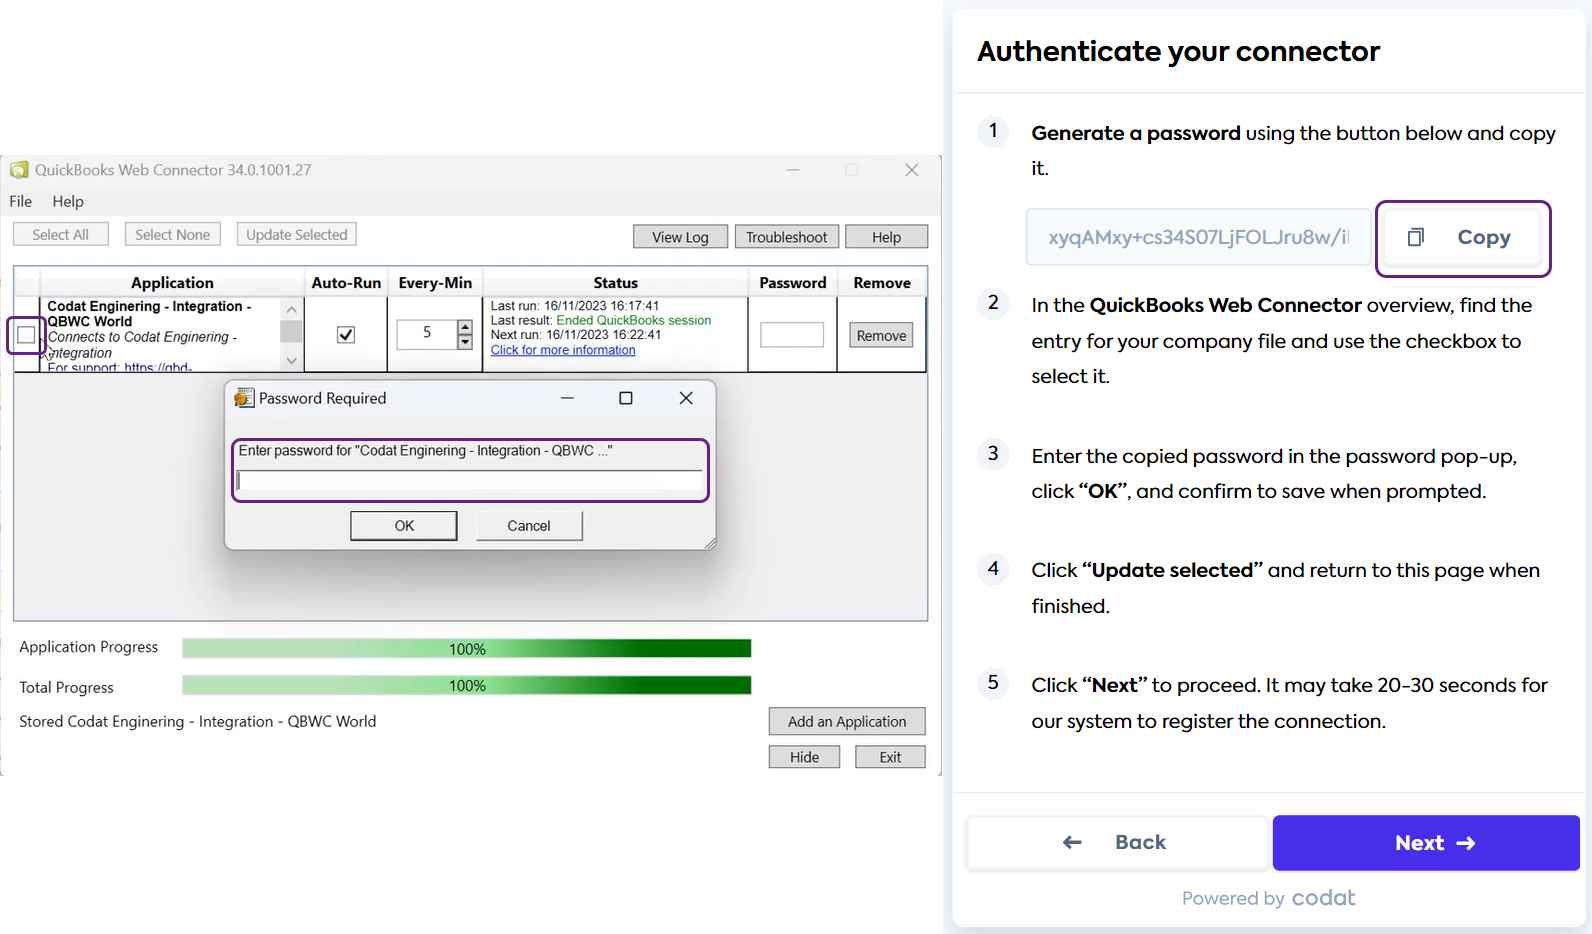
Next, the user should click Update Selected.
4. Optional: set up a syncSync The process of fetching the latest data from a connected data source. Syncs can be triggered manually or run automatically on a schedule. schedule
When issues occur in Codat’s QuickBooks Desktop integration, it's usually because the QuickBooks Desktop program is in use at the same time as the Intuit Web Connector is actively syncing data with Codat. This optional screen allows your end users to schedule syncsSync The process of fetching the latest data from a connected data source. Syncs can be triggered manually or run automatically on a schedule. to run outside of their business hours, avoiding the conflict.
Your users can configure the following options:
- SyncSync The process of fetching the latest data from a connected data source. Syncs can be triggered manually or run automatically on a schedule. window: the hours during which Codat will attempt to syncSync The process of fetching the latest data from a connected data source. Syncs can be triggered manually or run automatically on a schedule. data.
- Days: determines whether the schedule applies to weekdays only, or every day.
- Time zone: the end user's local time zone.
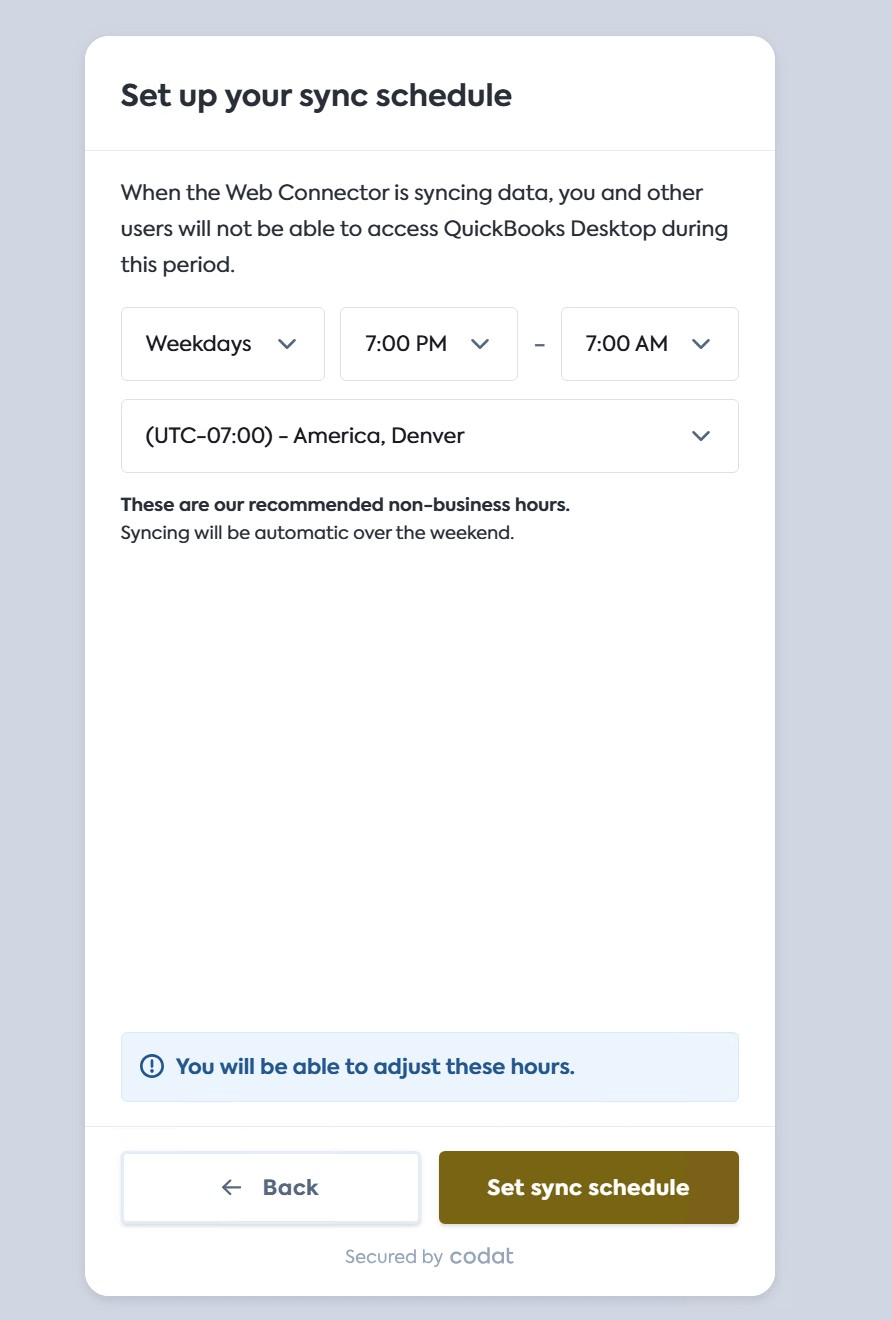
If the user doesn't customize their schedule, Codat detects their time zone from their browser settings and sets their syncSync The process of fetching the latest data from a connected data source. Syncs can be triggered manually or run automatically on a schedule. window to 19:00 - 07:00 on weekdays.
If you want to enable QuickBooks Desktop scheduling, reach out to your account manager or support.
5. Wait for the connector to complete first linkLink The authorization flow that allows end users to connect their accounting, banking, or commerce platforms to your application via Codat.
Once the password is saved, access to QuickBooks will be granted and the connector will process the datasets you have chosen to fetch on first linkLink The authorization flow that allows end users to connect their accounting, banking, or commerce platforms to your application via Codat. (see Data Sync Settings).
If you have chosen to have your connectors perform a one-time synchronization, your companyCompany In Codat, a company represents your customer's business entity. Companies can have multiple connections to different data sources. connectionConnection A link between a Codat company and a data source (like an accounting platform). Each connection represents authorized access to pull or push data from that platform. status will change to deauthorized after the initial syncSync The process of fetching the latest data from a connected data source. Syncs can be triggered manually or run automatically on a schedule..
If you have chosen to install your connectors for ongoing synchronizations, the connector will periodically process any dataset syncsSync The process of fetching the latest data from a connected data source. Syncs can be triggered manually or run automatically on a schedule. or write operations you have queued using the Codat Portal or APIAPI A set of rules and protocols that allows different software applications to communicate with each other. Codat provides APIs for accessing financial data from accounting, banking, and commerce platforms.. The connector will also start automatically when the system reboots.
If you are using syncSync The process of fetching the latest data from a connected data source. Syncs can be triggered manually or run automatically on a schedule. scheduling, data may not be pulled immediately, as the linking action may be taking place outside of the required schedule.
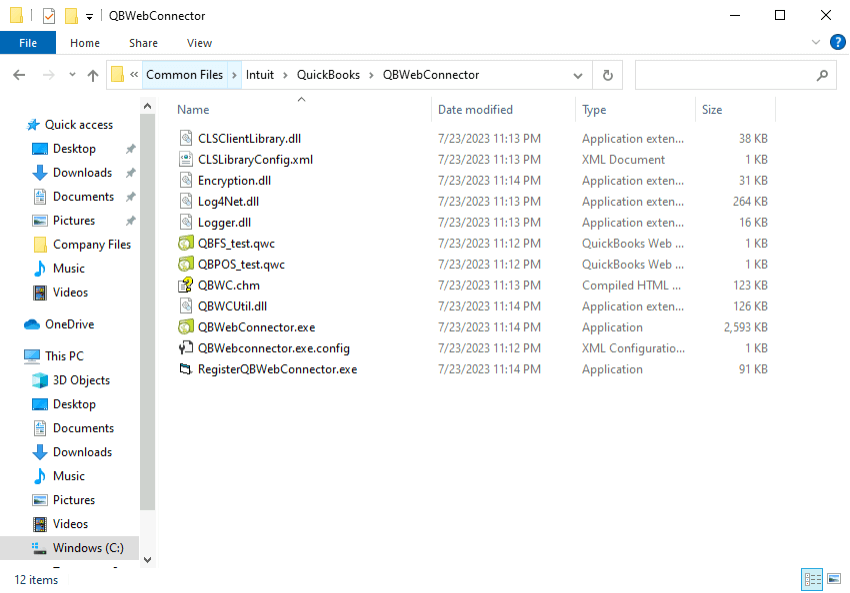
Installation path
The QuickBooks Desktop web connector is installed in Program Files.
C:\Program Files (x86)\Common Files\Intuit\QuickBooks\QBWebConnector
For example:
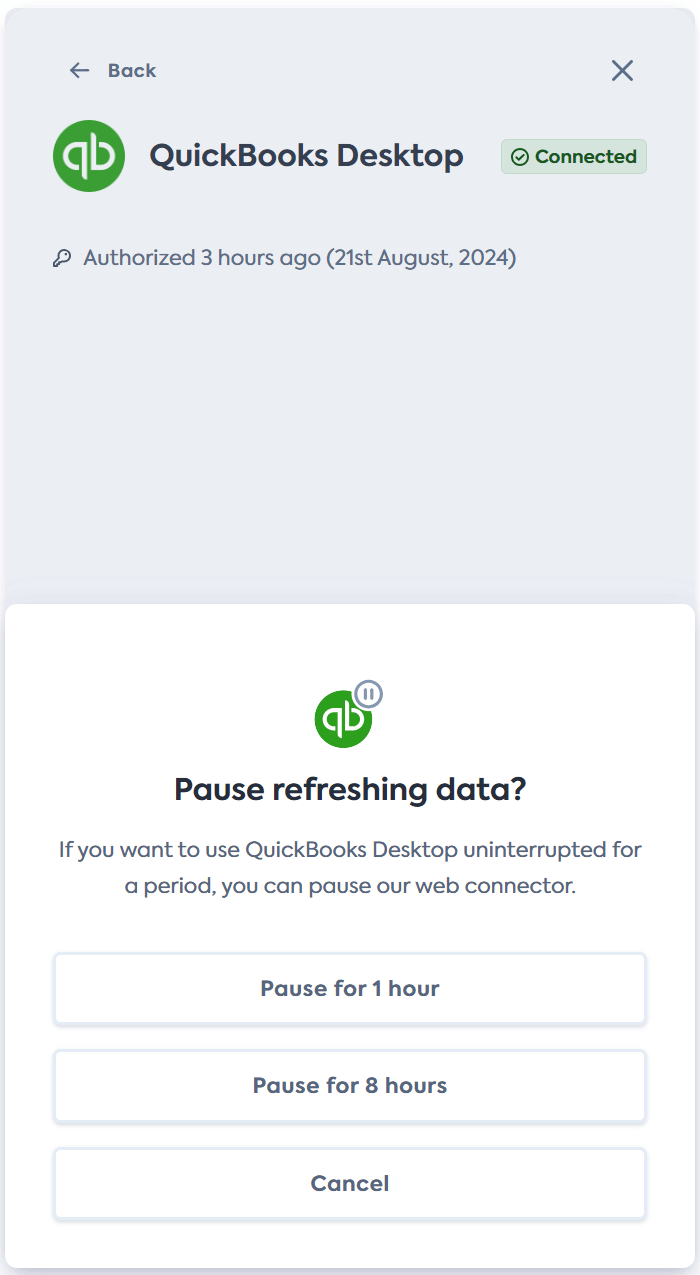
Pause the connector
Due to QBD's own limitations, it's not possible to use the software while it's syncing data through the connector. This applies to all connectors and syncsSync The process of fetching the latest data from a connected data source. Syncs can be triggered manually or run automatically on a schedule..
- If QBD is closed and the syncSync The process of fetching the latest data from a connected data source. Syncs can be triggered manually or run automatically on a schedule. is ongoing, the user won't be able to open the software until the syncSync The process of fetching the latest data from a connected data source. Syncs can be triggered manually or run automatically on a schedule. has finished.
- If QBD has a companyCompany In Codat, a company represents your customer's business entity. Companies can have multiple connections to different data sources. file open and the syncSync The process of fetching the latest data from a connected data source. Syncs can be triggered manually or run automatically on a schedule. is ongoing, QBD's interface may behave unexpectedly, reducing usability during these syncSync The process of fetching the latest data from a connected data source. Syncs can be triggered manually or run automatically on a schedule. periods.
To support a seamless user experience, enable your user to pause the syncSync The process of fetching the latest data from a connected data source. Syncs can be triggered manually or run automatically on a schedule. when they need to access QBD. You can easily do this with our Connections SDK. This embeddable component enables your users to pause ongoing or future syncsSync The process of fetching the latest data from a connected data source. Syncs can be triggered manually or run automatically on a schedule. for a set period as well as manage their data connectionsConnection A link between a Codat company and a data source (like an accounting platform). Each connection represents authorized access to pull or push data from that platform.. The pause functionality is only required for QBD connectionsConnection A link between a Codat company and a data source (like an accounting platform). Each connection represents authorized access to pull or push data from that platform..
Uninstall the connector
If your user wants to remove the web connector and disconnect the service, they should navigate to Windows Settings > Apps & features from the menu and search for Web Connector in the filter form.
The QuickBooks web connector will then appear in the results list, and the user can click Uninstall to remove the connector.
The user will also need to navigate to C:\Program Files (x86)\Common Files\Intuit\QuickBooks and delete the QBWebConnector file from there.
Remove the app certificate
Once the user has uninstalled the web connector, they may also want to remove the application certificate. To do this, they should open QuickBooks Desktop and navigate to Edit > Preferences > Integrated Applications > CompanyCompany In Codat, a company represents your customer's business entity. Companies can have multiple connections to different data sources. Preferences.
Next, they need to select your application and click Remove.