Set up your Plaid integration
Learn how to set up our Plaid integration, customize the Link journey, and enable production access
Before you can access your SMBSMB The primary customer segment that Codat helps businesses serve, typically companies with annual revenues under $500 million. customers' banking data from Plaid in Codat, you need to set up your integration.
You'll need to:
- Create your Plaid account, and test with the sandbox environment.
- Request access to the Plaid production environment and get your secure credentials.
- Request access to the Codat Portal.
- Add your secure credentials to the Codat Portal.
- Enable your Plaid integration.
-
If you already have a Plaid account, have your account details to hand.
-
If you don't, create an account before you start the setup process.
Configure your Plaid application
- Go to Plaid's Website, choose "Get APIAPI A set of rules and protocols that allows different software applications to communicate with each other. Codat provides APIs for accessing financial data from accounting, banking, and commerce platforms. Keys", and log in if required.
- On the welcome page, select Team Settings > APIAPI A set of rules and protocols that allows different software applications to communicate with each other. Codat provides APIs for accessing financial data from accounting, banking, and commerce platforms. from the top menu bar
- On the "Allowed redirect URIs", choose the configure option. You will need to enter
https://plaid.codat.io/oauth/callback. You may be prompted for your password when you save. - On the left hand menu select the Keys page.
- Make a note of your Sandbox and Development Keys, and your Client ID.
Add your secure credentials to the Codat Portal
-
Sign in to the Codat Portal.
-
On the navigation bar, select Settings > Integrations > Banking.
-
Click Set up on the Plaid tile.
The Integration settings page for Plaid is displayed. -
Locate the secure keys that you retrieved earlier and enter the following values:
- client_id value into Client ID.
- Sandbox secret value into Sandbox secret.
- Development secret value into Development secret.
-
From the Environment list, select Sandbox.
-
Enter country codes for the countries that you operate in, and want to allow your customers to linkLink The authorization flow that allows end users to connect their accounting, banking, or commerce platforms to your application via Codat. from. This filters the list of banks in the LinkLink The authorization flow that allows end users to connect their accounting, banking, or commerce platforms to your application via Codat. authorization flow to only banks in the selected countries, which might improve your conversion rate. Enter a comma-separated list of one or more of the following codes:
US,CA,ES,FR,GB,IE,NLIf no country codes are entered then all the above country codes are used by default. In the Plaid Sandbox and Development environments the default values are also
US,CA,ES,FR,GB,IE,NL. -
Select how you want to access companyCompany In Codat, a company represents your customer's business entity. Companies can have multiple connections to different data sources. data, and whether you want to continuously syncSync The process of fetching the latest data from a connected data source. Syncs can be triggered manually or run automatically on a schedule. data or only perform a one-off data syncSync The process of fetching the latest data from a connected data source. Syncs can be triggered manually or run automatically on a schedule. when the companyCompany In Codat, a company represents your customer's business entity. Companies can have multiple connections to different data sources. authorizes their connectionConnection A link between a Codat company and a data source (like an accounting platform). Each connection represents authorized access to pull or push data from that platform..
-
Click Save.
-
Return to Settings > Integrations > Banking.
-
Plaid should now be enabled. You can click the toggle next to Plaid to toggle the integration between Enabled and Disabled.
Customize the Plaid LinkLink The authorization flow that allows end users to connect their accounting, banking, or commerce platforms to your application via Codat. journey (optional)
Plaid allows you to customize the look, feel, and content of the linkLink The authorization flow that allows end users to connect their accounting, banking, or commerce platforms to your application via Codat. flow that customers see when they authorize access to their banking data. You can create and publish a customized journey in Plaid, then connect it to Codat. This is the customer experience you’ll follow during testing and production.
-
Log in to the Plaid Dashboard and go to Platform > LinkLink The authorization flow that allows end users to connect their accounting, banking, or commerce platforms to your application via Codat. > LinkLink The authorization flow that allows end users to connect their accounting, banking, or commerce platforms to your application via Codat. customization.
-
Create a new configuration or select an existing one by clicking the dropdown.
Make a note of the Name you assign to the configuration and the Countries you select as you will need these later in Codat.
-
Configure the journey to match your needs: adjust branding, institution options, and account selection options as required. For a full list of available customization options, see Plaid’s Link customization documentation.
-
Click Publish changes to save and apply your customizations.
-
In the Codat Portal, navigate to Settings > Integrations > Banking > Plaid.
- Enter the country code(s) for the countries you selected in step 2.
- Enter the LinkLink The authorization flow that allows end users to connect their accounting, banking, or commerce platforms to your application via Codat. configuration name you created or selected in step 2.
- Click Save to apply your changes.
Once complete, your customized Plaid LinkLink The authorization flow that allows end users to connect their accounting, banking, or commerce platforms to your application via Codat. journey will be applied to the banking data connectionConnection A link between a Codat company and a data source (like an accounting platform). Each connection represents authorized access to pull or push data from that platform. flow powered by Codat.
Select bank accounts
When a customer connects their bank account using Plaid, they can choose which accounts to share with you. By default, all available accounts are selected. You can customize this behavior in Plaid to let customers choose specific accounts instead.
- In the Plaid Dashboard, navigate to Platform > LinkLink The authorization flow that allows end users to connect their accounting, banking, or commerce platforms to your application via Codat. > LinkLink The authorization flow that allows end users to connect their accounting, banking, or commerce platforms to your application via Codat. customization.
- Select Account Select in the right-hand menu.
- To allow your customers to choose which accounts to share, select Enable for multiple accounts.
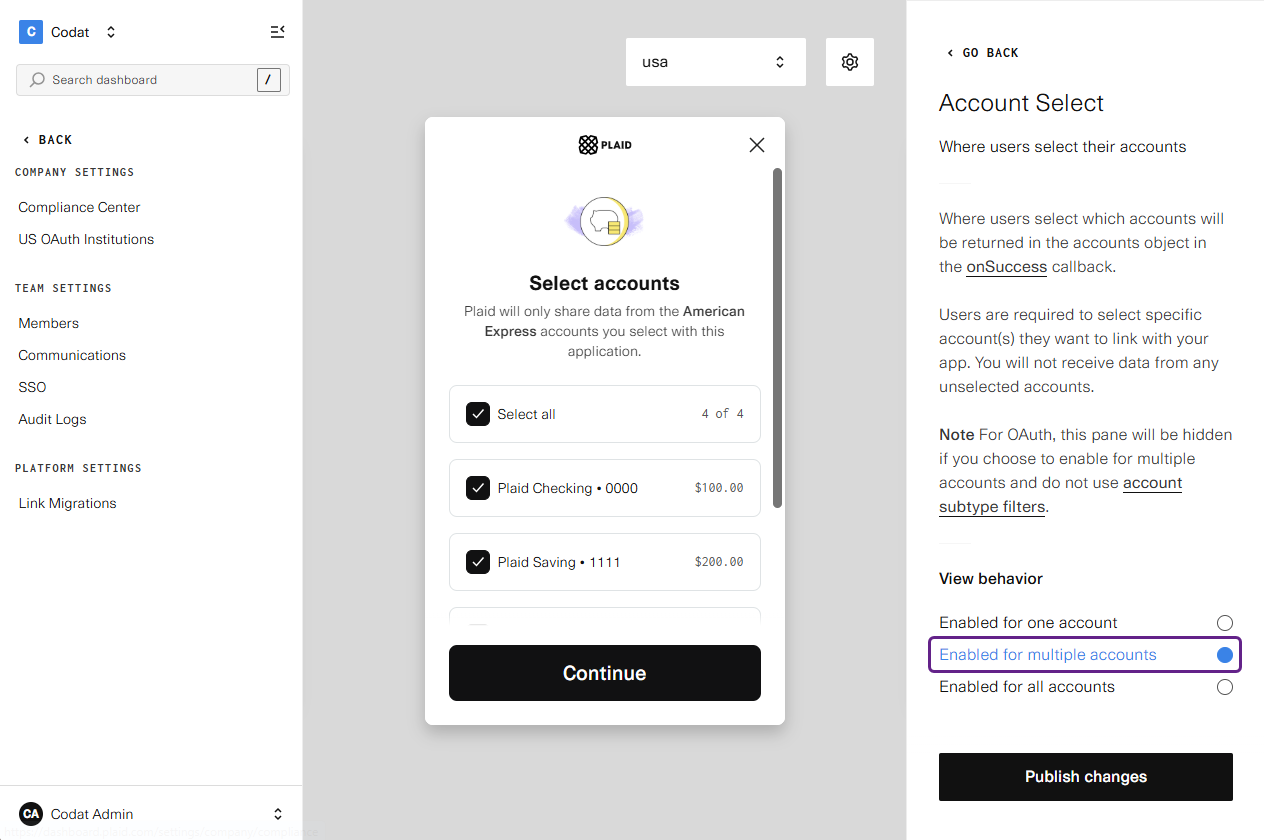
- Click Publish changes to save and apply your changes.
Once complete, Plaid will only share the accounts explicitly selected by your customers, and only those accounts will be passed to you via Codat.
Enable production access
When you are ready to connect to live data, you will need to request access from Plaid.
- Log in to the Plaid Dashboard.
- Select Migrate to Production and follow the process to request access to the Plaid production environment, and to get your secure credentials.
- Once you have your Production Secret, enter it in the box for the Production Secret within the Plaid configuration page in the Codat Portal.
- Please note that the Country Codes default value in Plaid's Production environment is the following:
US,CA.