Set up the Sage Bank Feeds integration
Set up our integration with Sage Bank Feeds and get your SMB users connected
Before you can write customer bank transactions to target bank accounts in Sage, you need to set up the integration for testing or production use.
This page explains how to:
- Enable the Sage Bank FeedsBank Feeds A Codat product that enables automatic synchronization of bank transaction data into a company's accounting software. integration.
- Optional: Personalize the default Codat authentication site by adding a call-to-action linkLink The authorization flow that allows end users to connect their accounting, banking, or commerce platforms to your application via Codat. and uploading a logo.
- Create a companyCompany In Codat, a company represents your customer's business entity. Companies can have multiple connections to different data sources. and data connectionConnection A link between a Codat company and a data source (like an accounting platform). Each connection represents authorized access to pull or push data from that platform., then add bank accounts.
- Surface the data connectionConnection A link between a Codat company and a data source (like an accounting platform). Each connection represents authorized access to pull or push data from that platform. ID to the user.
When you've completed those tasks, your SMBSMB The primary customer segment that Codat helps businesses serve, typically companies with annual revenues under $500 million. customers can connect their accounts to Sage using their data connectionConnection A link between a Codat company and a data source (like an accounting platform). Each connection represents authorized access to pull or push data from that platform. ID.
You can then update bank account details as needed.
Prerequisites
Complete the following prerequisites before setting up the Sage Bank FeedsBank Feeds A Codat product that enables automatic synchronization of bank transaction data into a company's accounting software. integration.
- You have access to a Testing Client for your Codat instance. Testing Clients are only available on Start-up and Enterprise plans.
- The Bank accounts and Bank transactions data types are enabled in your Data type settings.
For help with these prerequisites, contact your Solutions Engineer or Codat Support.
Enable the Sage Bank FeedsBank Feeds A Codat product that enables automatic synchronization of bank transaction data into a company's accounting software. integration
- Go to the Bank feed integrations page in the Codat Portal.
- Click Set up next to Sage Bank FeedsBank Feeds A Codat product that enables automatic synchronization of bank transaction data into a company's accounting software..
- Use the toggle to set the integration to Enabled.
Optional: Add a call-to-action linkLink The authorization flow that allows end users to connect their accounting, banking, or commerce platforms to your application via Codat.
You can add a call-to-action linkLink The authorization flow that allows end users to connect their accounting, banking, or commerce platforms to your application via Codat. to a web page containing more information. This might explain where your SMBSMB The primary customer segment that Codat helps businesses serve, typically companies with annual revenues under $500 million. users can obtain their data connectionConnection A link between a Codat company and a data source (like an accounting platform). Each connection represents authorized access to pull or push data from that platform. ID from within your application.
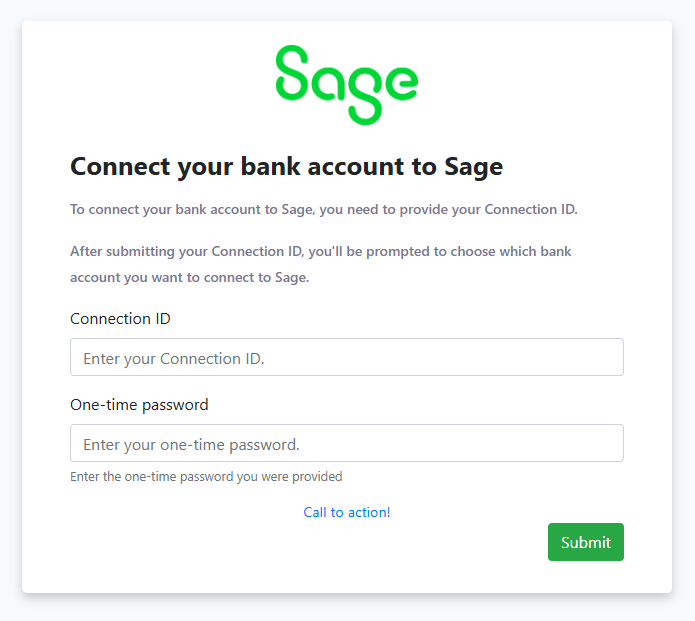
The call-to-action linkLink The authorization flow that allows end users to connect their accounting, banking, or commerce platforms to your application via Codat. will appear below the ConnectionConnection A link between a Codat company and a data source (like an accounting platform). Each connection represents authorized access to pull or push data from that platform. ID box in the default Codat authentication site, for example:

To add a call-to-action-linkLink The authorization flow that allows end users to connect their accounting, banking, or commerce platforms to your application via Codat.:
- Go to the Bank feed integrations page in the Codat Portal.
- Click Manage next to Sage Bank FeedsBank Feeds A Codat product that enables automatic synchronization of bank transaction data into a company's accounting software..
- Enter the linkLink The authorization flow that allows end users to connect their accounting, banking, or commerce platforms to your application via Codat. text in the Call-to-action text box.
- Enter the linkLink The authorization flow that allows end users to connect their accounting, banking, or commerce platforms to your application via Codat. URL in the Call-to-action URL box.
- Click Save.
Optional: Add your organization's logo
You can customize the appearance of the default Codat authentication site by adding your organization's logo. It will appear to the left of the Sage logo.
To upload a logo, go to the Branding page in the Codat Portal.
Create a companyCompany In Codat, a company represents your customer's business entity. Companies can have multiple connections to different data sources. and data connectionConnection A link between a Codat company and a data source (like an accounting platform). Each connection represents authorized access to pull or push data from that platform., then add bank accounts
-
Using POST /companies, create a CompanyCompany In Codat, a company represents your customer's business entity. Companies can have multiple connections to different data sources. to represent your SMBSMB The primary customer segment that Codat helps businesses serve, typically companies with annual revenues under $500 million. user:
POST https://api.codat.io/companiesRequest body:
{
  "name": "COMPANY_NAME"
}
The endpoint returns a JSON response containing the companyCompany In Codat, a company represents your customer's business entity. Companies can have multiple connections to different data sources.
idand theredirectURL. -
Using
POST /companies/{companyId}/connections, create a data connectionConnection A link between a Codat company and a data source (like an accounting platform). Each connection represents authorized access to pull or push data from that platform. to Sage Bank FeedsBank Feeds A Codat product that enables automatic synchronization of bank transaction data into a company's accounting software. for the CompanyCompany In Codat, a company represents your customer's business entity. Companies can have multiple connections to different data sources. you added. Specify thecompanyIdin the URL path:POST https://api.codat.io/companies/{companyId}/connectionsIn the request body specify the following
platformKey:{
"platformKey": "olpr"
}The endpoint returns a
200code and adataConnectionobject inPendingAuthstatus.{
"id": "4ab3eb02-d787-4ecd-o6e2-62d7fb7c4d32",
"integrationId": "2ce41026-589a-4330-8bfc-a30672253cd9",
"integrationKey": "olpr",
"sourceId": "98432954-a4fa-4640-a685-3af56909002a",
"platformName": "SageBankFeed",
"linkUrl": "https://link-api.codat.io/...", // do not use
"status": "PendingAuth",
"created": "2023-01-09T09:58:09.6678831Z",
"sourceType": "BankFeed"
}Do not send the Link URLDo not send the
linkUrlproperty to the SMBSMB The primary customer segment that Codat helps businesses serve, typically companies with annual revenues under $500 million. user. Unlike other Codat integrations, companyCompany In Codat, a company represents your customer's business entity. Companies can have multiple connections to different data sources. authentication is initiated within Sage as described in "SMBSMB The primary customer segment that Codat helps businesses serve, typically companies with annual revenues under $500 million. user flow: Connect a source bank account to Sage", below. -
Using POST /bankFeedAccounts, add one or more source bank accounts to make available to the SMBSMB The primary customer segment that Codat helps businesses serve, typically companies with annual revenues under $500 million. user.
POST /companies/{companyId}/connections/{connectionId}/connectionInfo/bankFeedAccountsIn the request body, specify a bank account. For example, to add a credit card account, send the following request (all fields shown are required):
{
  "id": "acc-002", // set to desired unique ID
  "accountName": "account-081",
  "sortCode": "123456",
  "accountType": "Credit",
  "accountNumber": "12345670",
  "currency": "GBP",
  "balance": 99.99 // can be 0
} -
The endpoint returns a
200code and the created bank account.
Surface the data connectionConnection A link between a Codat company and a data source (like an accounting platform). Each connection represents authorized access to pull or push data from that platform. ID to the user
Next, make the data connectionConnection A link between a Codat company and a data source (like an accounting platform). Each connection represents authorized access to pull or push data from that platform. ID from step two (above) available to the SMBSMB The primary customer segment that Codat helps businesses serve, typically companies with annual revenues under $500 million. user by, for example, surfacing the ID in your application. They'll need to enter this ID when connecting a bank account to Sage, as described in the next procedure.
Surface the one-time password (OTP) to the user
In order to authenticate the connectionConnection A link between a Codat company and a data source (like an accounting platform). Each connection represents authorized access to pull or push data from that platform., your user needs to enter a one-time password in their Sage product. Call the OTP endpoint to retrieve the OTP, then display it to the user in your application.
Let the user know they need to enter it when connecting a source bank account.
POST https://api.codat.io/companies/{{companyId}}/connections/{{dataConnectionId}}/bankFeeds/otp
SMBSMB The primary customer segment that Codat helps businesses serve, typically companies with annual revenues under $500 million. user flow: Connect a source bank account to Sage
To connect a source bank account to a target bank account in Sage, your SMBSMB The primary customer segment that Codat helps businesses serve, typically companies with annual revenues under $500 million. user uses the Connect Bank functionality in a supported Sage product. The exact steps depend on which Sage product they're using.
Alternatively, you can authenticate users through your own web app.
-
On the Banking tab, they locate the bank account to which they want to import bank transactions.
-
They click Connect Bank on the account and then select your institution from the list of banks and other financial institutions.
-
They enter their data connectionConnection A link between a Codat company and a data source (like an accounting platform). Each connection represents authorized access to pull or push data from that platform. ID in the ConnectionConnection A link between a Codat company and a data source (like an accounting platform). Each connection represents authorized access to pull or push data from that platform. ID feld and the one-time password in the One-time password field, then click Submit:
-
If the SMBSMB The primary customer segment that Codat helps businesses serve, typically companies with annual revenues under $500 million. user successfully authenticated with Codat, the flow displays a list of available source bank accounts created using the Create single source account or Create source accounts endpoints. For example:

-
The SMBSMB The primary customer segment that Codat helps businesses serve, typically companies with annual revenues under $500 million. user selects the bank account they want to connect, then clicks OK.
-
The SMBSMB The primary customer segment that Codat helps businesses serve, typically companies with annual revenues under $500 million. user is redirected to the Sage product from which they started the connectionConnection A link between a Codat company and a data source (like an accounting platform). Each connection represents authorized access to pull or push data from that platform. flow.
-
On some Sage supported products, the SMBSMB The primary customer segment that Codat helps businesses serve, typically companies with annual revenues under $500 million. user may need to click Confirm on the account's Banking Cloud tab to change the status from
Pending ConfirmationtoPending.
You can now use the GET /bankFeedAccounts endpoint to retrieve the source bank accounts. The status property of a source bank account must have changed to connected before you can begin to write bank transactions from the account.
The SMBSMB The primary customer segment that Codat helps businesses serve, typically companies with annual revenues under $500 million. user flow is now complete.
Update bank account details
To update the details of one or more source bank accounts in Sage, use the PATCH /bankFeedAccounts endpoint.
PATCH /companies/{companyId}/connections/{connectionId}/connectionInfo/bankFeedAccounts/{bankAccountId}
Where {bankAccountId} is the id of the source bank account you want to update.
Provide the details to update as request parameters. You only need to provide the details you want to update. For example, to update the account name, send the following request body:
{
  "accountName": "new account name"
}
The endpoint returns a 200 code and the updated bank account details. For example:
{
  "id": "acc-003",
  "accountName": "new account name", // updated account name
  "accountType": "Credit",
  "accountNumber": "12345671",
  "sortCode": "123456",
  "currency": "GBP",
  "balance": 100.09,
  "modifiedDate": "2023-01-09T14:14:14.1057478Z",
  "status": "pending"
}
Next steps
Next you can write bank transactions from a source bank account.