Set up the Dynamics 365 Business Central integration
Explore our API integration with Dynamics 365 Business Central.
Before you can access data from customers who use Dynamics 365 Business Central, you need to set up the integration in the Codat Portal. You'll need to:
- Register and configure your Business Central application and then generate your client ID
- Generate your client secret
- Update access permissions
- Add your secure keys to the Codat Portal
- Enable the Dynamics 365 Business Central integration in the Codat Portal
We recommend you test your integration using a trial Business Central account before production use.
During the SMBSMB The primary customer segment that Codat helps businesses serve, typically companies with annual revenues under $500 million. linking process, the Dynamics 365 Business Central extension package must be successfully installed to the user's account in order for the integration to function. The extension is published by Codat.
For more information, see Extension installation process below.
Prerequisites
A Dynamics 365 Business Central license is required to use our integration. At a minimum, you'll need a Dynamics 365 Business Central Essentials license.
For more information, see the Business Central pricing page for your region.
We also assume that your organization already has its Microsoft account configured, and the domain name in your account email has been DNS-verified. If you are creating an account for the very first time, you may need to create a tenant for your organization and verify the domain.
Register your application
Register your Business Central application on the Microsoft Azure portal.
-
Sign in to the Microsoft Azure portal.
-
If you already have a Dynamics 365 Business Central account, use those account details to sign in. If not, you can create an account.
-
To gain access to any Azure configuration that your companyCompany In Codat, a company represents your customer's business entity. Companies can have multiple connections to different data sources. has already set up—for example, for user authentication—enter your companyCompany In Codat, a company represents your customer's business entity. Companies can have multiple connections to different data sources. email when you sign up.
-
If your organization is using Microsoft Entra ID to control access to Dynamics 365 Business Central, ask your Azure administrator to add your account to the correct group.
Unable to create accountContact your Business Central administrator if you can't create a new Business Central account. They might have disabled this feature.
-
-
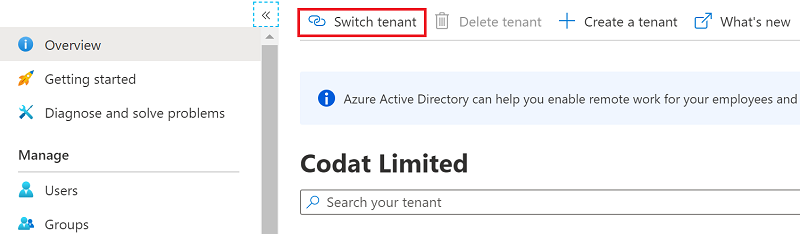
After you've signed in, select Microsoft Entra ID on the home page or left menu.
Details of the tenant that your account is connected to are displayed.
-
You might have access to more than one tenant, so check the details carefully. If you don't see the expected information, select Switch tenant, then select the right tenant.
-
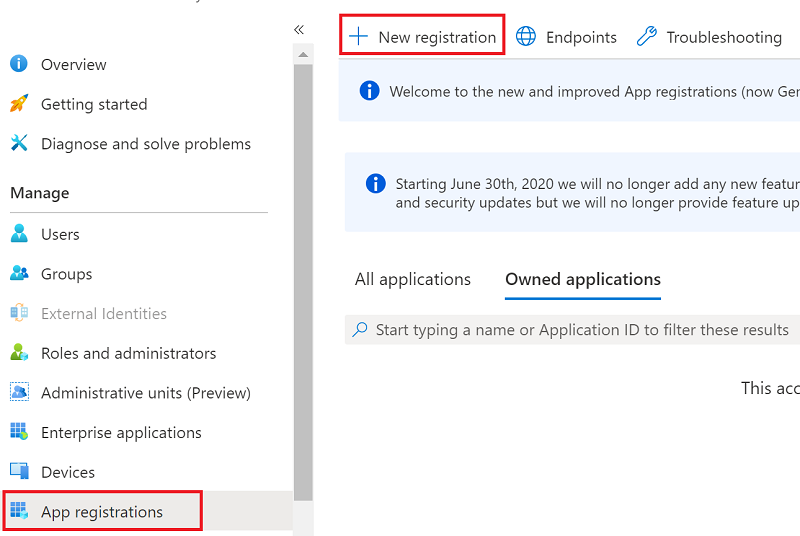
Select App registrations in the left menu, then click New registration.
-
Enter the following details:
-
Name: Enter a short name for your application. Your customers will see this name when they authorize your connectionConnection A link between a Codat company and a data source (like an accounting platform). Each connection represents authorized access to pull or push data from that platform. to their accounting system.
-
Supported account types: Select Accounts in any organizational directory (Any Microsoft Entra ID directory - Multitenant) and personal Microsoft accounts (e.g. Skype, Xbox). This allows Codat to access data in Dynamics 365 Business Central.
-
Redirect URI: Select Web, then enter the following URL:
https://dynamics365businesscentral.codat.io/oauth/callback
-
-
Select Register.
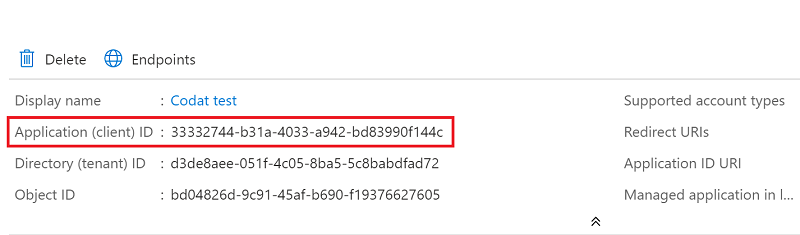
Azure registers your application details and generates your client ID as shown the screenshot below. You'll need this later, so either copy the details now or keep the page open in a separate browser tab.
❗ Copy your client ID
Your client ID won't be shown again after you close the page.
Generate and retrieve your client secret
In the Azure Portal:
-
Select Certificates & secrets in the left menu.
-
Under Client secrets, click New client secret.
-
In the Add a client secret dialog, update the following information:
- Description: Enter a short description for your client secret to make it easier to find.
- Expires: Select the most appropriate option that complies with your companyCompany In Codat, a company represents your customer's business entity. Companies can have multiple connections to different data sources.'s security policy.
-
Click Add.
Your client secret is generated and displayed at the bottom of the page. Important: The Secret Value won't be displayed again in full, so you must copy the value now.

Update access permissions
Now update the access permissions for your application. These control the data that your app can access in Business Central.
-
Select APIAPI A set of rules and protocols that allows different software applications to communicate with each other. Codat provides APIs for accessing financial data from accounting, banking, and commerce platforms. permissions in the left menu.
-
Under Configured permissions, click Add a permission.
-
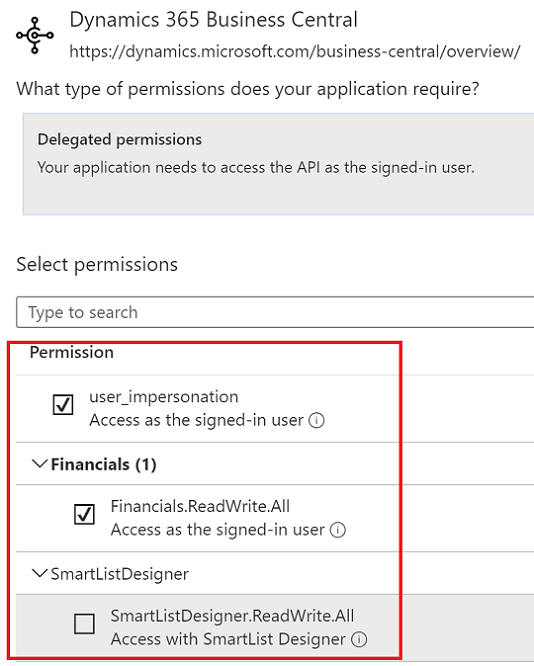
In the Request APIAPI A set of rules and protocols that allows different software applications to communicate with each other. Codat provides APIs for accessing financial data from accounting, banking, and commerce platforms. permissions pane, scroll down and select Dynamics 365 Business Central.
-
Select Delegated permissions and also select the first two listed permissions:
- user_impersonation
- Financials.ReadWrite.All
-
Click Add permissions.
-
Above the listed permissions, select Grant admin consent for Default Directory and then select Yes to confirm your change. This option might not be available for all subscription types.
Your Dynamics 365 Business Central application setup is complete.
Add your App's secure keys to the Codat Portal
-
In the Codat Portal, go to the Accounting integrations page.
-
Locate Dynamics 365 Business Central and click Set up.
-
Under Integration settings, enter the values for the Client ID and Client secret from the Azure Portal.
-
Click Save. A confirmation message appears if the settings were saved successfully.
-
The Enable Dynamics 365 Business Central dialog is displayed. Select whether to enable the integration now or later.
Enable the Dynamics 365 Business Central integration
- In the Codat Portal, go to the Accounting integrations page.
- Locate Dynamics 365 Business Central and click the toggle to enable the integration.
You can also click Manage to view the integration's settings page, and then enable the integration from there.
Your Dynamics 365 Business Central integration is now set up.
Extension installation process
Before you linkLink The authorization flow that allows end users to connect their accounting, banking, or commerce platforms to your application via Codat. their accounts, we recommend you inform your customers about the installation and linking process for the Dynamics 365 Business Central extension.
During the linking process, Codat installs a Dynamics 365 Business Central extension into the customer's Business Central environment. This extension has the following attributes:
- Description/Publisher: Codat
- Name: App LinkLink The authorization flow that allows end users to connect their accounting, banking, or commerce platforms to your application via Codat.
The extension might take 10–20 minutes to install and the installation page might refresh repeatedly while the installation is in progress. A message displays when the extension has been successfully installed.
Be aware that fetch errors might occur during the installation.
If the latest version of the extension is uninstalled or unpublished, Codat is unable to retrieve all the required data from the accounting software.