Set up the QuickBooks Online integration
Explore our API integration with QuickBooks Online.
Video walkthrough:
Before you can access data from customers who use QuickBooks Online for their accounting, you need to set up the QuickBooks Online integration.
You'll need to:
- Create an app in the Intuit Developer Portal.
- Before production use, you need to enter some details about your app and complete the App Assessment Questionnaire provided by Intuit. For help, see our guide to the QBO assessment questionnaire.
- Intuit reviews your questionnaire to ensure your app meets their platform requirements.
- If your app is approved, you can access its production keys for use with the production integration.
- Add your app's secure keys to the Codat Portal.
Your app development keys and production keys are not interchangeable. Development keys do not work with live QuickBooks Online accounts.
Before you begin, make sure you understand the different QuickBooks Online environments.
QuickBooks Online environments
QuickBooks Online provides two separate environments:
- A sandbox companyCompany In Codat, a company represents your customer's business entity. Companies can have multiple connections to different data sources. containing sample data for development and testing purposes. You automatically get one when you create a QBO developer account. See Create and test with a sandbox company in the Intuit developer documentation, or navigate to your profile, then Sandbox, in the Intuit Developer Portal.
- A live QuickBooks account (including free trials).
Sandbox companies can only connect to a QuickBooks Online app using the app's development keys. Live accounts can only connect to a QuickBooks Online app using the app's production keys.
To support these environments, you'll find two separate integrations in the Codat Portal:
- QuickBooks Online Sandbox: for development and testing.
- QuickBooks Online: for production use.
This page explains how to configure both integrations.
Create a QuickBooks Online app configured for sandbox
In the Intuit Developer Portal, create and register a QuickBooks Online app and then configure it for use with the QuickBooks Online Sandbox integration.
-
Sign in to the Intuit Developer Portal.
You can use your existing QuickBooks Online credentials to create a new Intuit Developer account.
-
Select Dashboard from the top menu to view the My Apps Dashboard page.
-
Click Create an app.
-
Select the QuickBooks Online and Payments option.
-
Provide the following information on the Give your app a name page:
- Enter a name for your app.
- Select the com.intuit.quickbooks.accounting scope.
- Click Create app.
Your app is created and the Develop your app page is displayed.
-
In the left menu, select Keys & credentials under Development Settings to view the Keys & OAuth page.
-
Under Redirect URIs, click Add URI to add a new row to the table. Then, enter the redirect URI for the QuickBooks Online Sandbox integration:
https://quickbooksonlinesandbox.codat.io/oauth2/callback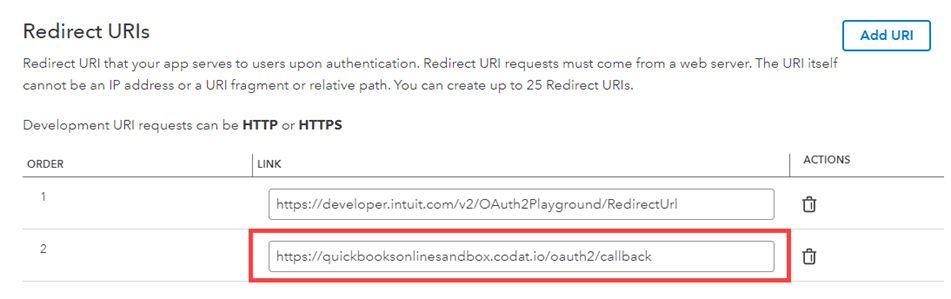
-
Click Save.
You can find your app's development keys — the Client ID and Client Secret — in the Keys section at the top of the Keys & OAuth page.
Next steps
Next, add your app's development keys to the QuickBooks Online Sandbox integration, as described in Add your app's secure keys to the Codat Portal.
Alternatively, you can get your app's production keys as explained in the next procedure.
Get production keys and configure app for production
Before you can access your app's production keys, you must complete the requirements described in this procedure. You can reuse the app you created earlier.
When the production keys are available, configure the app for use with the production integration.
Make sure you've created a QuickBooks Online app configured for sandbox first.
In the Intuit Developer Portal:
-
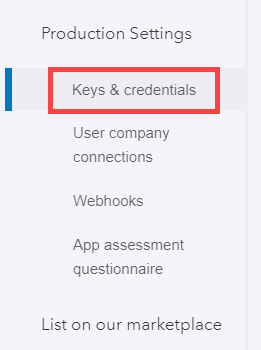
In the left menu, select Keys & credentials under Production Settings.
The Get your app's production keys page is displayed.
-
Next, you need to provide all the information requested in the Add details about your app checklist:
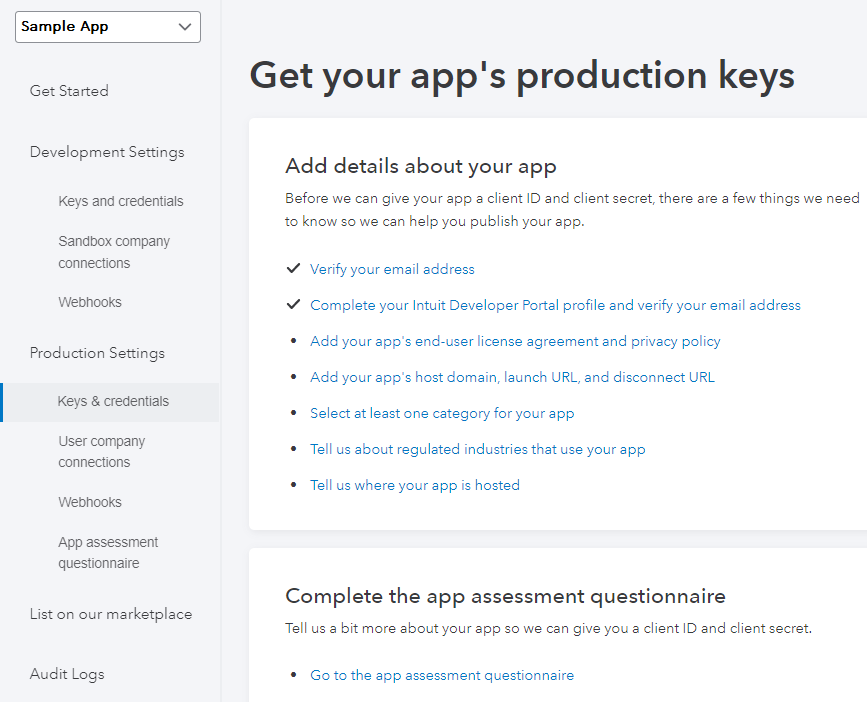
You'll need to provide the following information:
- Host domain: URL of the domain host of your website or app.
- Launch URL: Initial URL for your app's authorization flow. If using no-code LinkLink The authorization flow that allows end users to connect their accounting, banking, or commerce platforms to your application via Codat., provide the generic LinkLink The authorization flow that allows end users to connect their accounting, banking, or commerce platforms to your application via Codat. URL, which you can access in the Codat Portal.
- Disconnect URL: LinkLink The authorization flow that allows end users to connect their accounting, banking, or commerce platforms to your application via Codat. to the process for deauthorizing your app's access to QuickBooks Online. You can provide the URL of the Disconnect a data source from a company endpoint. If you don't have a disconnect URL, provide a linkLink The authorization flow that allows end users to connect their accounting, banking, or commerce platforms to your application via Codat. to your website or app instead.
For app hosting details, see QBO app hosting.
-
Click Go to the app assessment questionnaire to open the questionnaire. See Complete the App Assessment Questionnaire below for guidance on answering the questionnaire.
-
When you've completed all the requirements and your questionnaire responses have been approved by Intuit, the page updates to display the production keys for your app (the Client ID and Client Secret) on the Keys & OAuth page.
-
Provide the following information on the Keys & OAuth page (accessed by selecting Production Settings > Keys & credentials):
- Under Redirect URIs, click Add URI to add a new row to the table.
- In the new row, enter the redirect URI for the QuickBooks Online (production) integration:
https://quickbooksonline.codat.io/oauth2/callback -
Click Save.
When you've provided all the requested information, your app's production keys—the Client ID and Client Secret—are made available on the Keys & OAuth page. To find the keys, select Keys & credentials under Production Settings:
Next steps
Next, add your production keys to the QuickBooks Online integration, as described in Add your secure keys to Codat, below.
Completing the App Assessment Questionnaire
Before you can access your app's production keys, you must complete an App Assessment Questionnaire. Intuit will review your answers to make sure your app meets their publishing requirements and guidelines.
As a Codat client, you will be linked to a shortened version of the App Assessment Questionnaire. This happens automatically provided you have set the sandbox environment redirect URI to https://quickbooksonlinesandbox.codat.io/oauth2/callback according to our instructions.
Existing users should have received an email from Intuit with a linkLink The authorization flow that allows end users to connect their accounting, banking, or commerce platforms to your application via Codat. to the questionnaire. For recommended answers to the questions pertaining to Codat, see QBO App Assessment Questionnaire.
To access the questionnaire from the Intuit Developer Portal:
- Select Dashboard from the top navigation bar.
- Select Production Settings.
- Click Go to the app assessment questionnaire at the bottom of the page.
- Enter your answers then submit the questionnaire to Intuit.
Add your app's secure keys to the Codat Portal
After you've created and configured a QuickBooks Online app, add the app's development or production keys to the corresponding integration (either sandbox or production) in the Codat Portal. When you're ready, enable the integration.
- In the Codat Portal, go to the Accounting integrations page.
- Locate QuickBooks Online Sandbox or QuickBooks Online, then click Set up.
- Under Integration settings, enter the Client ID and Client secret from your QuickBooks Online app.
- If you configured your app for the sandbox integration, enter your app's development keys.
- If you configured your app for the production integration, enter your app's production keys.
- Click Save. A confirmation message appears if the settings were saved successfully.
- The Enable QuickBooks Online Sandbox or Enable QuickBooks Online dialog is displayed. Select whether to enable the integration now or later.
Make sure that your secure keys don't contain any spaces.
Enable the QuickBooks Online integration
- In the Codat Portal, go to the Accounting integrations page.
- Locate QuickBooks Online and click the toggle to enable the integration.
You can also click Manage to view the integration's settings page, and then enable the integration from there.