Install the Sage 50 connector
Guide for SMB users to set up our Sage 50 on-premise connector.
Customers must install and run the Sage 50 connector on the same computer where Sage 50 (UK & Ireland) is installed. If in doubt, ask your customer to linkLink The authorization flow that allows end users to connect their accounting, banking, or commerce platforms to your application via Codat. their accounting data from the computer that they normally use to access Sage 50 (UK & Ireland).
To install the Sage 50 Accounts Connector, the user who is connecting their companyCompany In Codat, a company represents your customer's business entity. Companies can have multiple connections to different data sources. data—the SMBSMB The primary customer segment that Codat helps businesses serve, typically companies with annual revenues under $500 million. user—must complete the following tasks:
- Download the connector
- Launch the connector and enter their license key
- Verify company data file
- Select a company data file
- Enter their Sage 50 Accounts credentials
- Verify company data
1. Download the connector
First, the user downloads the Sage 50 Accounts on-premise connector from a Codat LinkLink The authorization flow that allows end users to connect their accounting, banking, or commerce platforms to your application via Codat. URL.
If you're using the Codat LinkLink The authorization flow that allows end users to connect their accounting, banking, or commerce platforms to your application via Codat. flow, the user can download the connector after they've selected Sage 50 Accounts as their accounting software in LinkLink The authorization flow that allows end users to connect their accounting, banking, or commerce platforms to your application via Codat.. To start the download, they click Download Connector:

Next, the user copies their license key (which is the same as their CompanyId in Codat) to use in the next step.
If you've built your own LinkLink The authorization flow that allows end users to connect their accounting, banking, or commerce platforms to your application via Codat. flow, the linkUrl field on the companyCompany In Codat, a company represents your customer's business entity. Companies can have multiple connections to different data sources.'s Sage 50 Accounts data connectionConnection A link between a Codat company and a data source (like an accounting platform). Each connection represents authorized access to pull or push data from that platform. will initiate the installer download.
The Sage 50 Accounts Connector is packaged as a .exe file. To increase your clients' trust in the download, the filename is prefixed with your companyCompany In Codat, a company represents your customer's business entity. Companies can have multiple connections to different data sources. name; that is, the name of the companyCompany In Codat, a company represents your customer's business entity. Companies can have multiple connections to different data sources. the user is connecting their data to. For example: YourCompanyName-sage50-connector.exe. Symbols in the filename are replaced with dashes.
Additionally, the file is signed with an Extended Validation Code Signing Digital Certificate issued by GlobalSign.
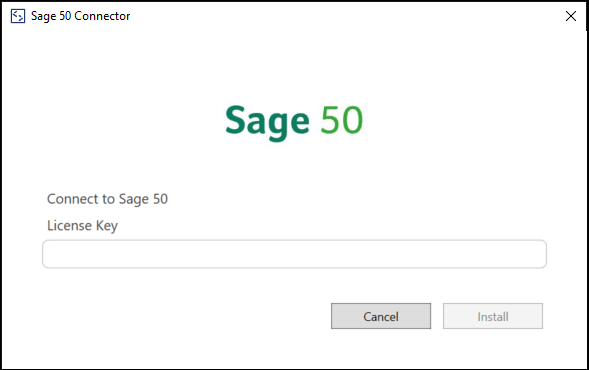
2. Launch the connector and enter their license key
When the connector has been downloaded and run, a screen similar to the following is displayed.
If the user's computer has anti-virus software installed, they might be asked to confirm they trust the source of the file. This confirmation is specific to each anti-virus program.
The user should have been provided with a License Key when they downloaded the Sage 50 Accounts Connector. They should enter this in the License Key box and then click Install.
The user's license key is their Codat companyCompany In Codat, a company represents your customer's business entity. Companies can have multiple connections to different data sources. ID.
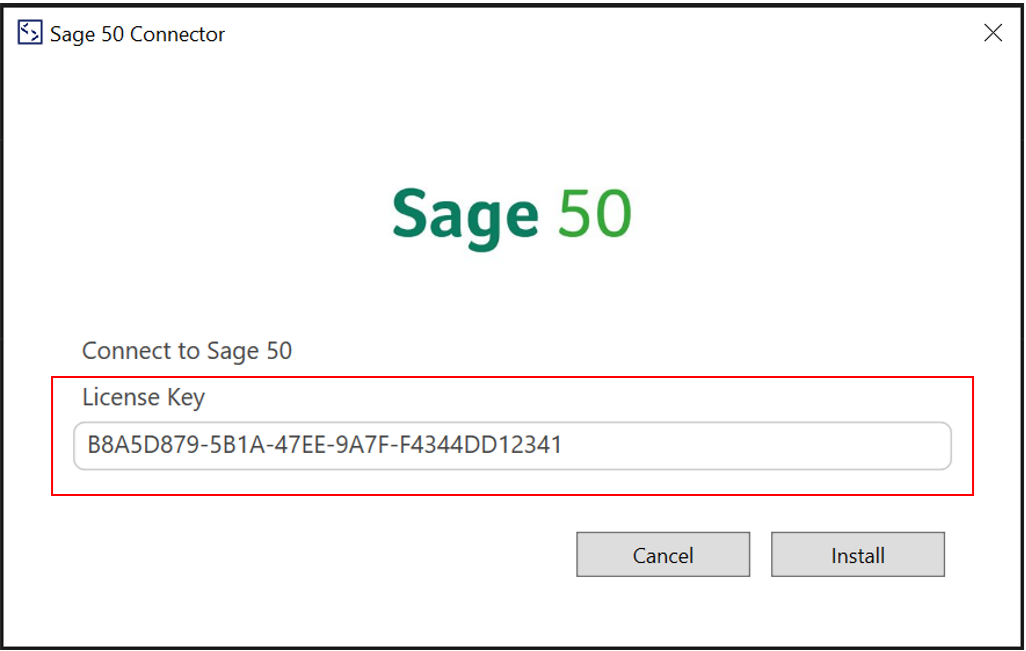
If the license key is valid, the connector will be installed; this takes a few minutes to complete. The user will see an error if the license key is not valid.
The progress bar shows the status of the installation; for example:

Once the installation is complete, the user will be taken to the Sage 50 Accounts Connector's configuration screen as described in the next step.
3. Verify companyCompany In Codat, a company represents your customer's business entity. Companies can have multiple connections to different data sources. data file
The connector will start automatically once the installation is complete and display the Verify companyCompany In Codat, a company represents your customer's business entity. Companies can have multiple connections to different data sources. data file step:

Before progressing to the next step, the user should open Sage 50 Accounts for the companyCompany In Codat, a company represents your customer's business entity. Companies can have multiple connections to different data sources. data file they want to connect to, and check the file for errors.
For more information on how to check the file for errors, see Check your data is in good health in the Sage 50 Accounts documentation.
4. Select a companyCompany In Codat, a company represents your customer's business entity. Companies can have multiple connections to different data sources. data file
On the Select a companyCompany In Codat, a company represents your customer's business entity. Companies can have multiple connections to different data sources. data file step, the user selects the companyCompany In Codat, a company represents your customer's business entity. Companies can have multiple connections to different data sources. data file to linkLink The authorization flow that allows end users to connect their accounting, banking, or commerce platforms to your application via Codat. with. Once selected, the Data file location box is automatically populated with the file path where the companyCompany In Codat, a company represents your customer's business entity. Companies can have multiple connections to different data sources. data file resides in the user's system.

Alternatively, you can manually enter the data file location path in the Data file location box.
If you want to syncSync The process of fetching the latest data from a connected data source. Syncs can be triggered manually or run automatically on a schedule. demo data, you can enter the following path:
C:\PROGRAMDATA\SAGE\ACCOUNTS\2022\DEMODATA
For example:
.png")
5. Enter their Sage 50 credentials
On the Set your credentials step, the user enters their Sage 50 username and password in the boxes provided. The username and password entered must be for a Sage 50 user account with permission to read all the data you plan to synchronize.
If your product requires writing data to Sage 50, the user should create a separate user login in Sage 50 to be used solely by the Sage 50 Connector. This is required to prevent concurrent access issues.
For more information, see the separate article about writing data to Sage 50.
Once the Sage 50 information has been entered, the user should click Next to proceed to the final step.

If the user enters an incorrect username, password, or data directory location, the connector will show them an error message.
6. Verify companyCompany In Codat, a company represents your customer's business entity. Companies can have multiple connections to different data sources. data
If valid information was entered in the previous step, a confirmation dialog is displayed that gives helpful information about the companyCompany In Codat, a company represents your customer's business entity. Companies can have multiple connections to different data sources. that will be linked. This includes:
- The full companyCompany In Codat, a company represents your customer's business entity. Companies can have multiple connections to different data sources. name
- The last transaction date
- The Sage version
- The file location in the user's system (Data directory)

This helps to ensure the correct companyCompany In Codat, a company represents your customer's business entity. Companies can have multiple connections to different data sources. data will be synced and prevent incorrect companyCompany In Codat, a company represents your customer's business entity. Companies can have multiple connections to different data sources. data from being processed.
Assuming this is the correct file to linkLink The authorization flow that allows end users to connect their accounting, banking, or commerce platforms to your application via Codat., the user should select the I confirm I want to linkLink The authorization flow that allows end users to connect their accounting, banking, or commerce platforms to your application via Codat. this companyCompany In Codat, a company represents your customer's business entity. Companies can have multiple connections to different data sources. checkbox, then click Next.
The user is then redirected to the Codat LinkLink The authorization flow that allows end users to connect their accounting, banking, or commerce platforms to your application via Codat. flow, where they can see that the connectionConnection A link between a Codat company and a data source (like an accounting platform). Each connection represents authorized access to pull or push data from that platform. was successful.

The initial synchronization will take several minutes to complete, although larger Sage 50 files (for example, files with a high number of transactions) might take up to 30 minutes.
Depending on the configuration as documented here, the connector will perform one of two possible actions after the initial synchronization is complete. The connector will either:
- Run in the background and automatically synchronize data when new datasets are queued; or
- Uninstall itself once the initial one-time syncSync The process of fetching the latest data from a connected data source. Syncs can be triggered manually or run automatically on a schedule. is complete.