Migration guide
Learn how to migrate from a custom link flow to our embedded Link component
Overview
This guide helps you migrate from a custom linkLink The authorization flow that allows end users to connect their accounting, banking, or commerce platforms to your application via Codat. flow to our embedded LinkLink The authorization flow that allows end users to connect their accounting, banking, or commerce platforms to your application via Codat. component. LinkLink The authorization flow that allows end users to connect their accounting, banking, or commerce platforms to your application via Codat. offers a native, secure, and best in class experience to connect your customers’ financial software.
Prerequisites
You need a JavaScript application to render the LinkLink The authorization flow that allows end users to connect their accounting, banking, or commerce platforms to your application via Codat. component. Our component works with vanilla JavaScript and all major JavaScript frameworks. TypeScript is supported and recommended.
Your current implementation
User experience
Your current implementation likely starts with a consent page, confirming that your customers are happy to share their financial data with you before they interact with Codat. This often includes information on the purpose, platform data accessed, and your retention policy.
Codat's LinkLink The authorization flow that allows end users to connect their accounting, banking, or commerce platforms to your application via Codat. component optionally supports consent management and more, as part of your migration you may wish to leverage this native functionality to remove maintenance overhead in your application.
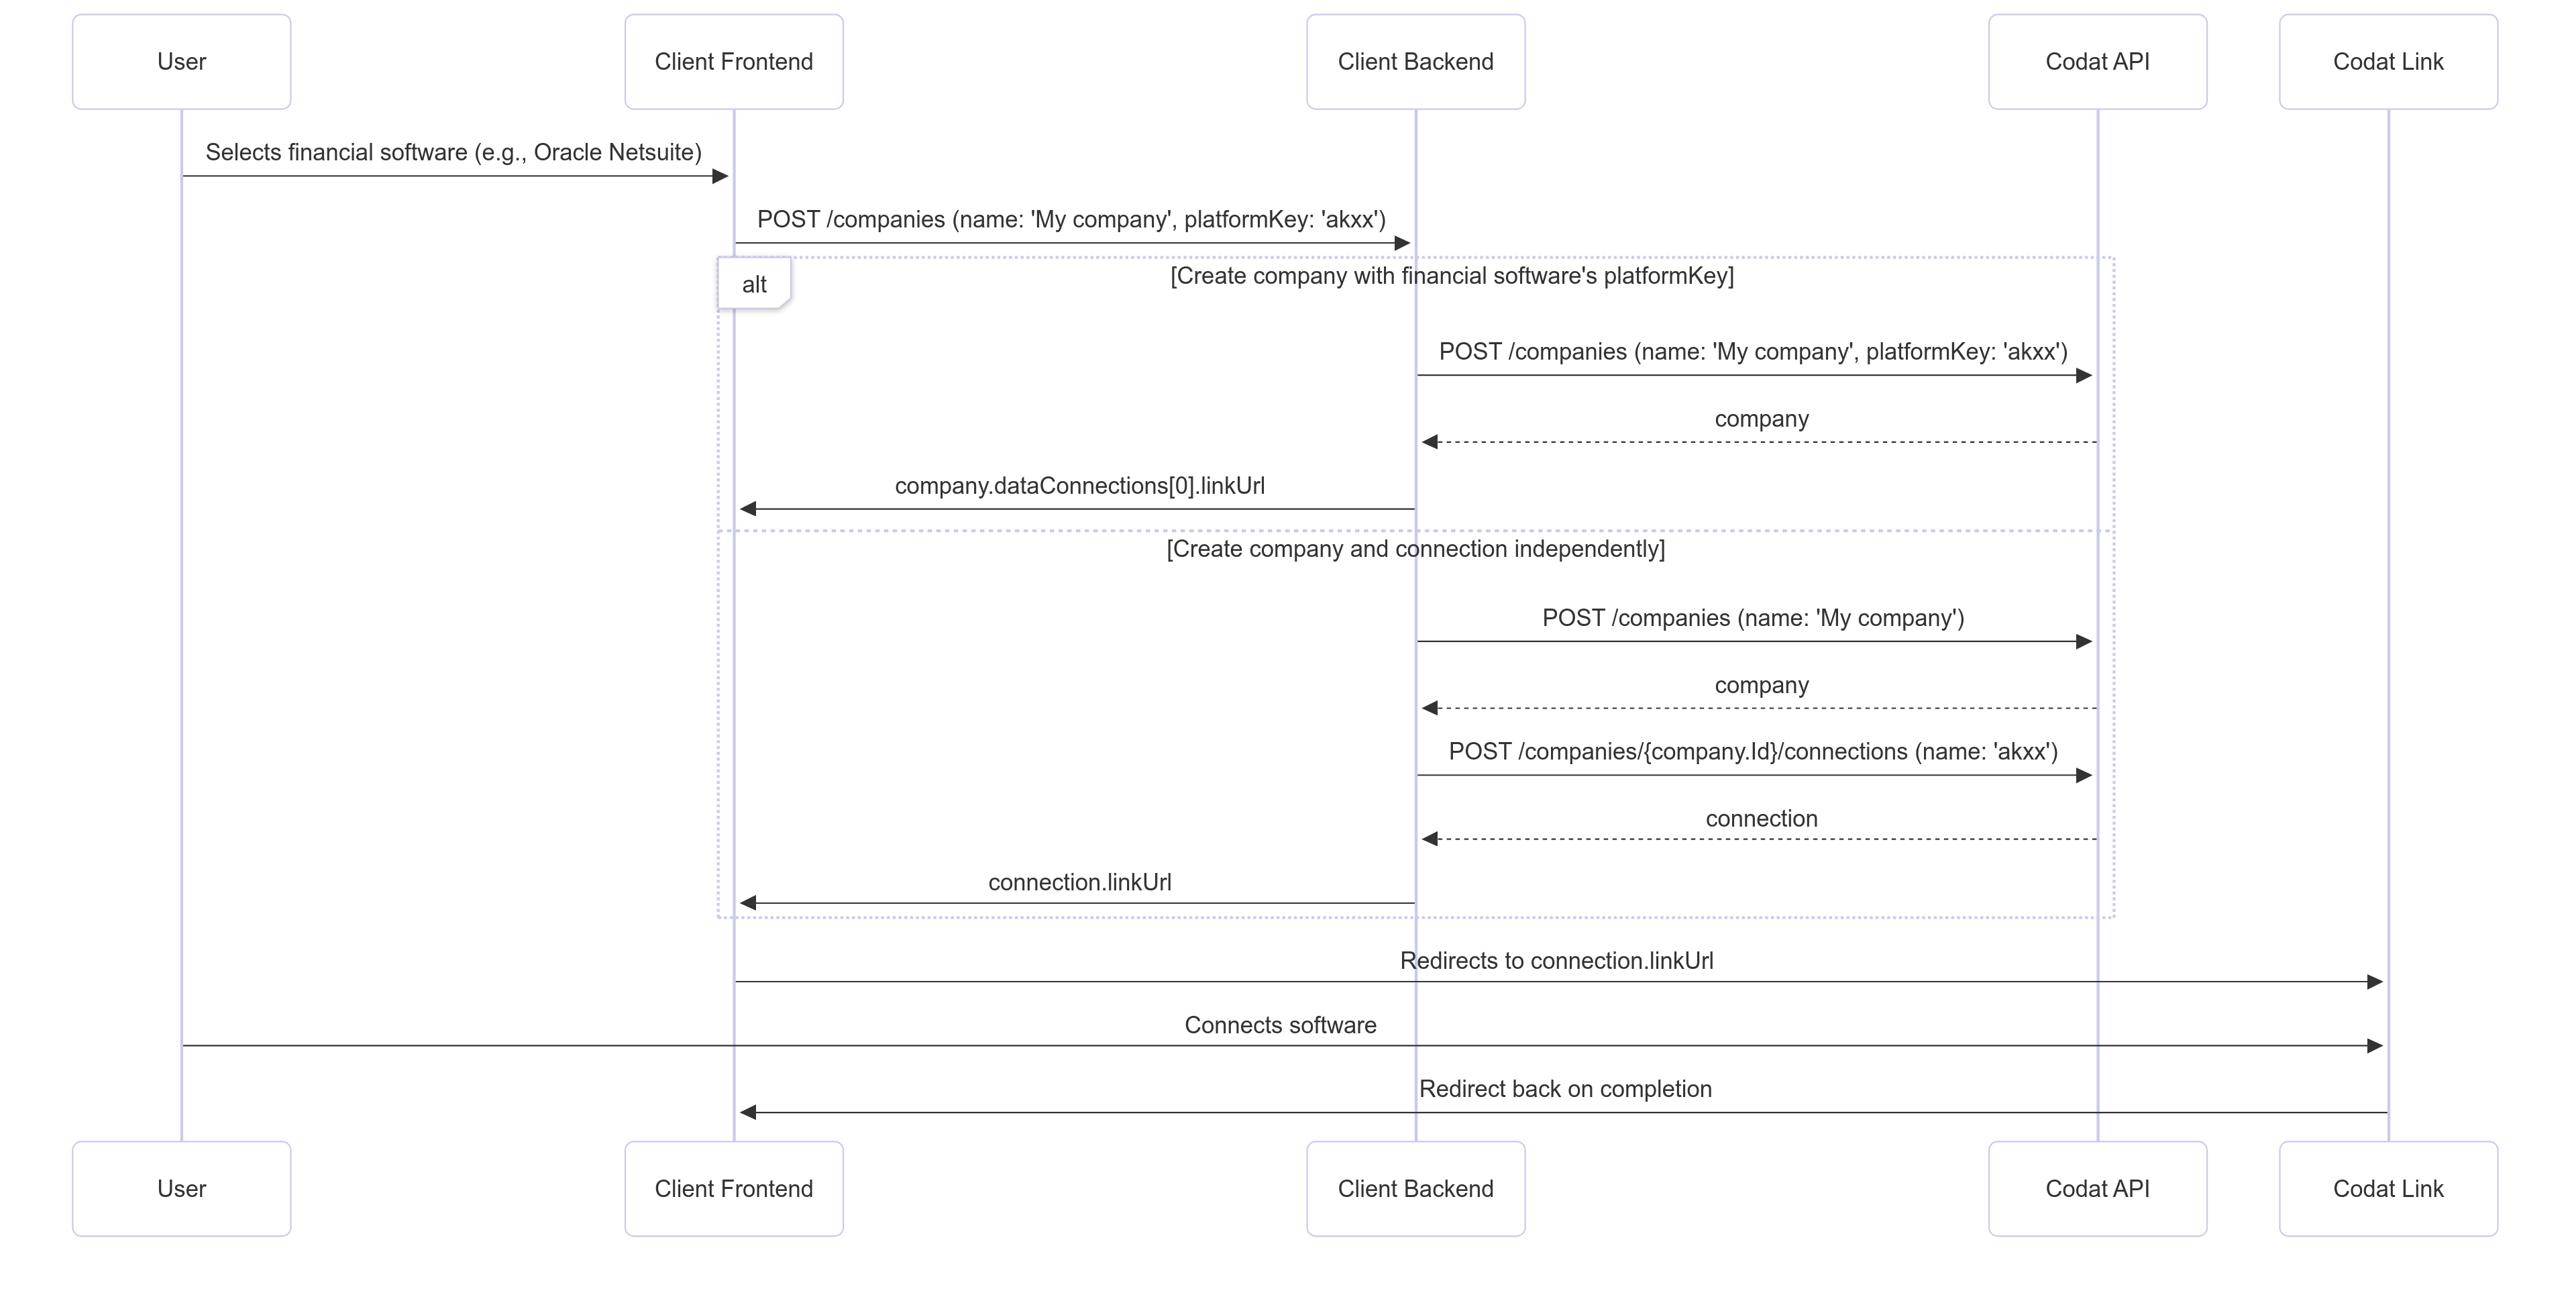
Custom linkLink The authorization flow that allows end users to connect their accounting, banking, or commerce platforms to your application via Codat. workflow
There are two common approaches for custom linkLink The authorization flow that allows end users to connect their accounting, banking, or commerce platforms to your application via Codat. flows, depending on your use case:
-
Create a companyCompany In Codat, a company represents your customer's business entity. Companies can have multiple connections to different data sources. with a platformKey:
You pass the companyCompany In Codat, a company represents your customer's business entity. Companies can have multiple connections to different data sources. name and the financial software’splatformKeyin one APIAPI A set of rules and protocols that allows different software applications to communicate with each other. Codat provides APIs for accessing financial data from accounting, banking, and commerce platforms. call. Best suited for users connecting to a single financial system. -
Create companyCompany In Codat, a company represents your customer's business entity. Companies can have multiple connections to different data sources. and connectionConnection A link between a Codat company and a data source (like an accounting platform). Each connection represents authorized access to pull or push data from that platform. separately:
You create the companyCompany In Codat, a company represents your customer's business entity. Companies can have multiple connections to different data sources. first, then create a connectionConnection A link between a Codat company and a data source (like an accounting platform). Each connection represents authorized access to pull or push data from that platform.. This approach is typically followed when connecting several platforms for one customer e.g. Accounting Platform and Banking.
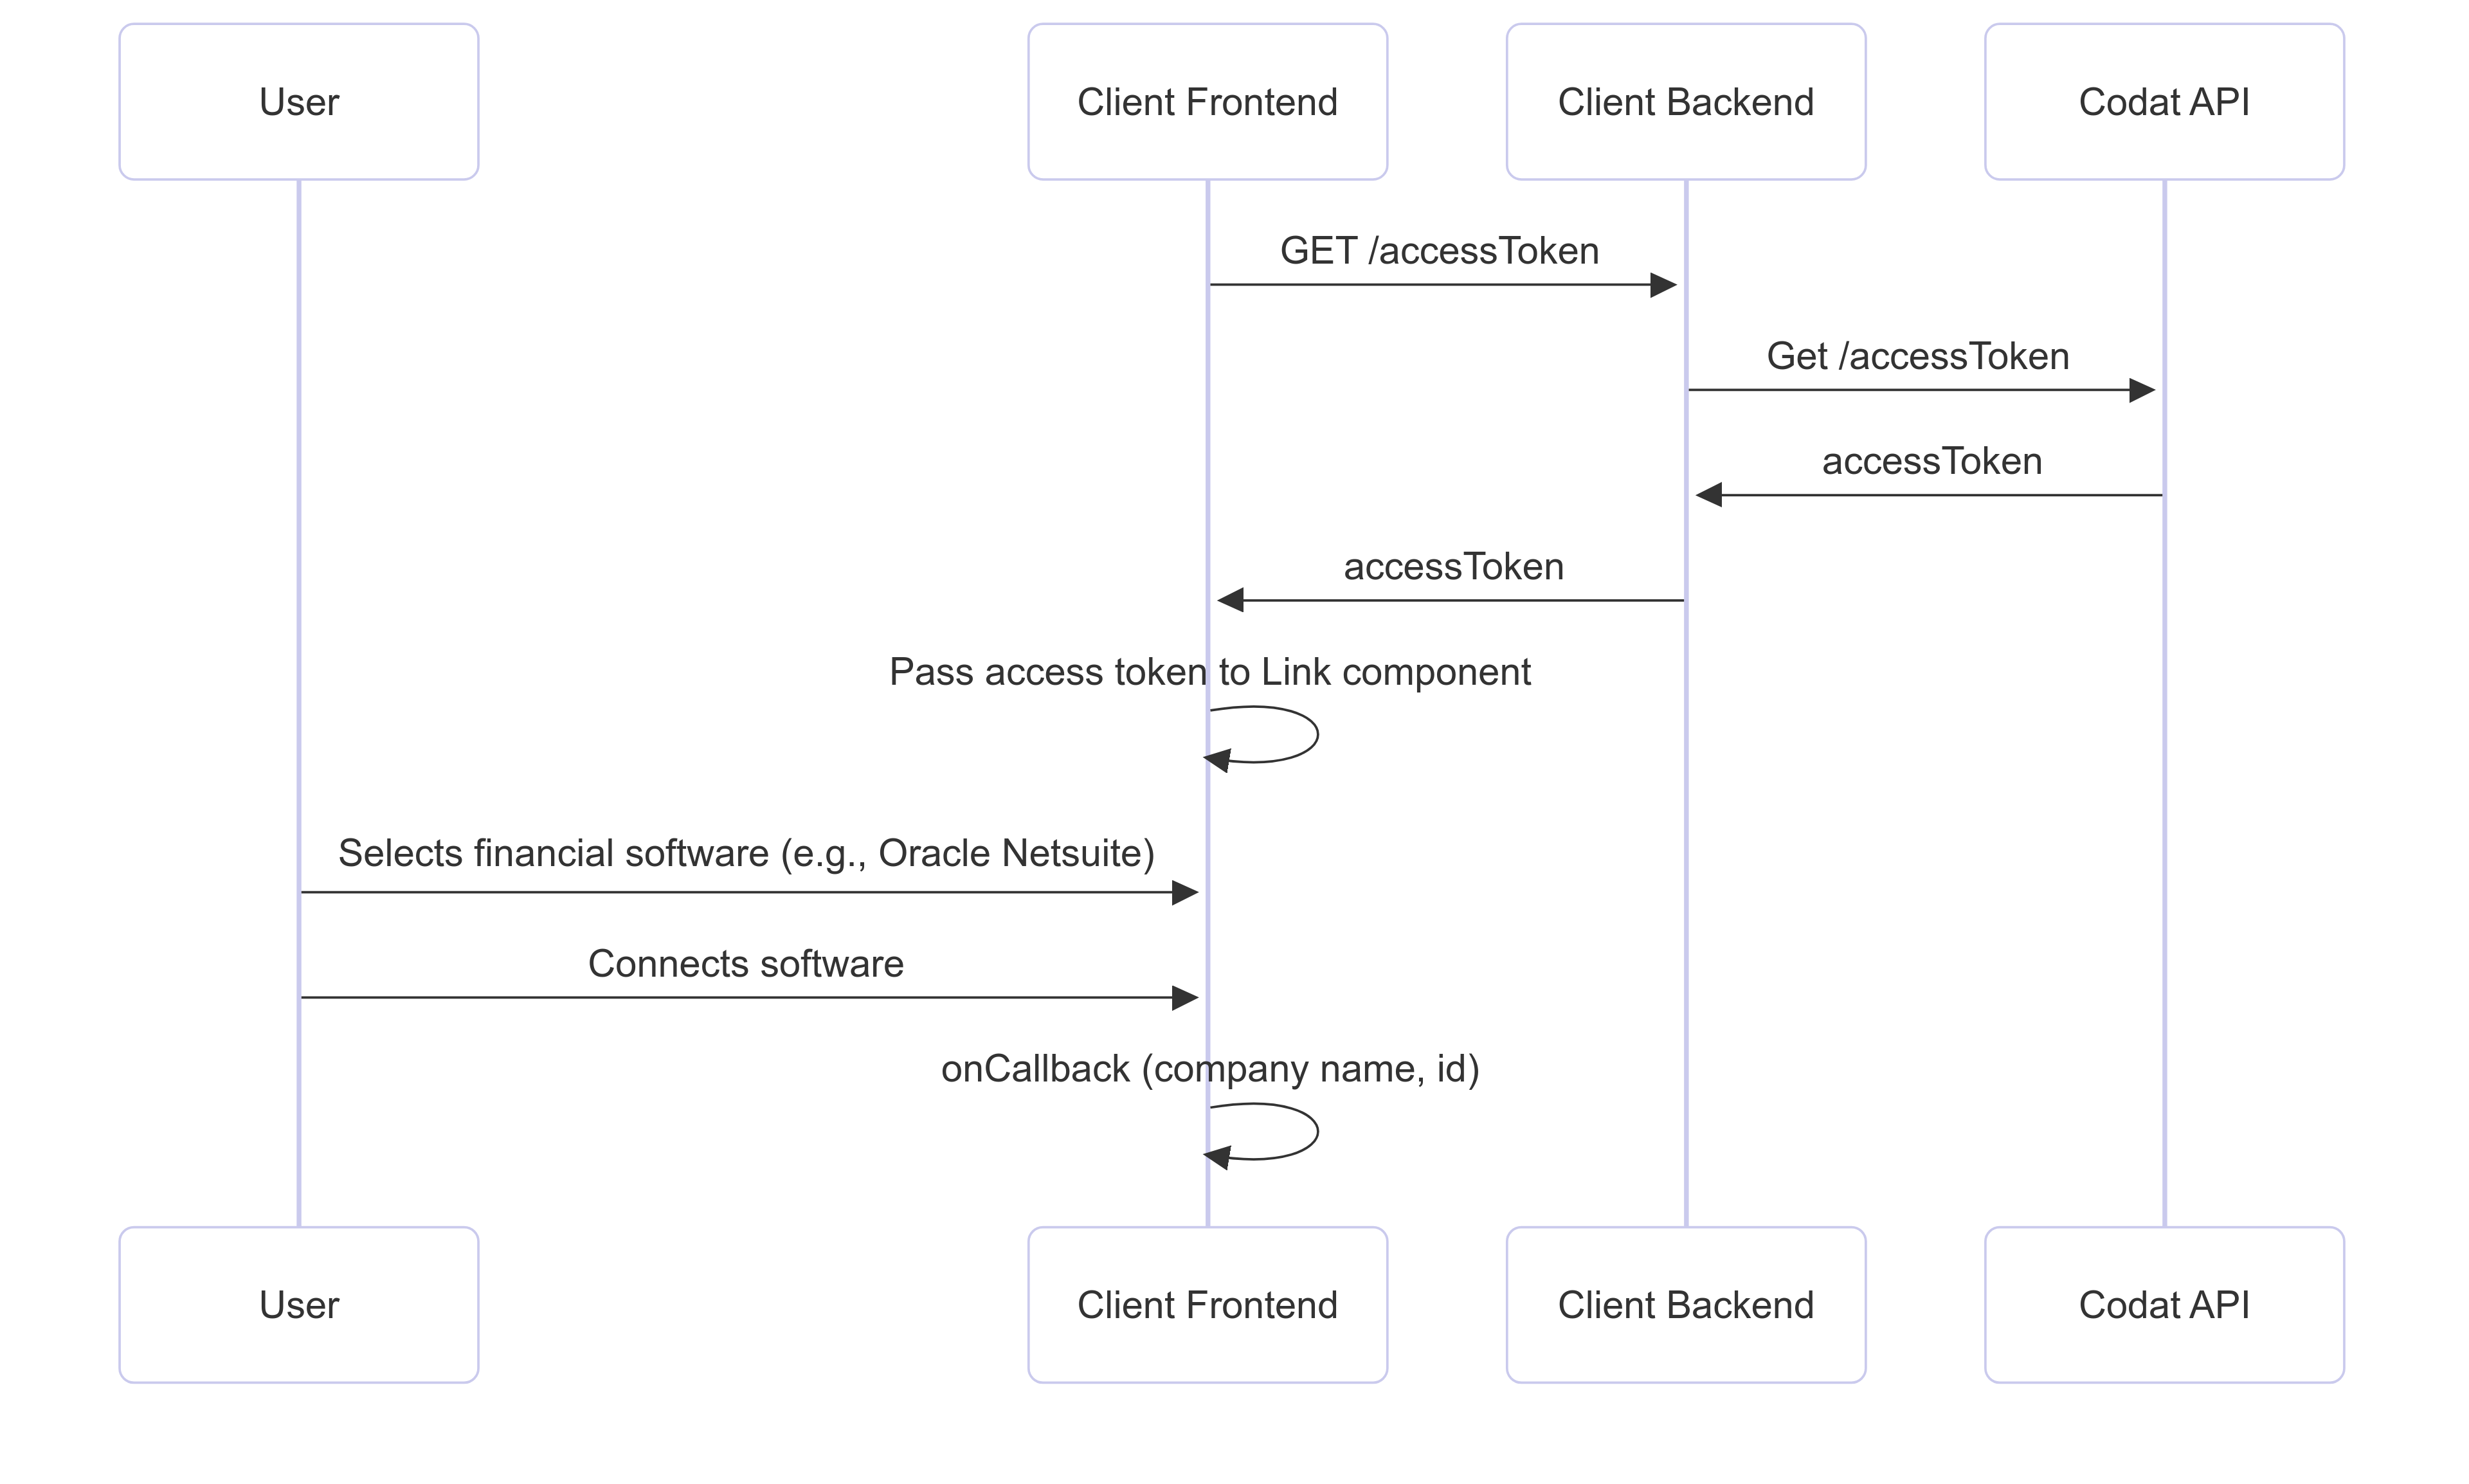
The LinkLink The authorization flow that allows end users to connect their accounting, banking, or commerce platforms to your application via Codat. approach
The embedded LinkLink The authorization flow that allows end users to connect their accounting, banking, or commerce platforms to your application via Codat. component replaces your custom implementation while preserving the user experience elements you've already built. Instead of managing connectionConnection A link between a Codat company and a data source (like an accounting platform). Each connection represents authorized access to pull or push data from that platform. logic, APIAPI A set of rules and protocols that allows different software applications to communicate with each other. Codat provides APIs for accessing financial data from accounting, banking, and commerce platforms. calls, and UI components in your frontend:
- Your backend requests an access token from Codat’s APIAPI A set of rules and protocols that allows different software applications to communicate with each other. Codat provides APIs for accessing financial data from accounting, banking, and commerce platforms..
- You pass the access token and companyCompany In Codat, a company represents your customer's business entity. Companies can have multiple connections to different data sources. name to the LinkLink The authorization flow that allows end users to connect their accounting, banking, or commerce platforms to your application via Codat. component.
- The user completes the connectionConnection A link between a Codat company and a data source (like an accounting platform). Each connection represents authorized access to pull or push data from that platform. flow in the embedded UI.
LinkLink The authorization flow that allows end users to connect their accounting, banking, or commerce platforms to your application via Codat. supports both of your current approaches — whether you're using the platform key flow for single connectionsConnection A link between a Codat company and a data source (like an accounting platform). Each connection represents authorized access to pull or push data from that platform. or the two-step approach for multiple software connectionsConnection A link between a Codat company and a data source (like an accounting platform). Each connection represents authorized access to pull or push data from that platform..
Retain your current user experience
Your existing consent page, data sharing policies, and user onboarding flow don't need to change. LinkLink The authorization flow that allows end users to connect their accounting, banking, or commerce platforms to your application via Codat. is highly customizable, allowing you to:
- Preserve your consent flow: Use custom consent pages with your existing messaging about data purpose and retention.
- Maintain your branding: Control colors, logos, and styling to match your application.
- Choose your layout: Display LinkLink The authorization flow that allows end users to connect their accounting, banking, or commerce platforms to your application via Codat. in modal or non-modal views based on your current UI patterns.
- Control the journey: Decide when and how users interact with the connectionConnection A link between a Codat company and a data source (like an accounting platform). Each connection represents authorized access to pull or push data from that platform. flow.
This means you can migrate your implementation to leverage the features of our LinkLink The authorization flow that allows end users to connect their accounting, banking, or commerce platforms to your application via Codat. product, whilst maintaining your existing customer experience and consent journey.
Learn how to customize your auth flow
Migration steps
Step 1: Set up CORS
Cross-origin resource sharing (CORS) settings are required for access tokens to work. Configure CORS settings on your Codat instance:
- Use Set CORS settings to register allowed domains
- Use Get CORS settings to view your current configuration
Step 2: Implement access token retrieval
- Create a backend endpoint to proxy Codat's APIAPI A set of rules and protocols that allows different software applications to communicate with each other. Codat provides APIs for accessing financial data from accounting, banking, and commerce platforms..
- In that endpoint, call
GET /accessTokento retrieve an access token for the LinkLink The authorization flow that allows end users to connect their accounting, banking, or commerce platforms to your application via Codat. component. - Return the
accessTokenin the response.
Step 3: Embed LinkLink The authorization flow that allows end users to connect their accounting, banking, or commerce platforms to your application via Codat. component
Codat provides a types package on npm that contains type definitions for our LinkLink The authorization flow that allows end users to connect their accounting, banking, or commerce platforms to your application via Codat. component primitives. We recommend using this package as it simplifies your implementation.
npm install @codat/sdk-link-types
- React
- NextJS
- JavaScript
- Angular
- Vue
- Svelte
Get started with React
For an example of the component in action, see our demo app.
-
Create a component that mounts the SDK
You can copy and paste the example
CodatLink.tsxfile to an appropriate location in your app. We recommend setting the component towidth: 460px; height: 840pxbecause it's optimized to look best with these parameters. -
Use the component to mount the SDK
We suggest wrapping the
CodatLinkcomponent in a modal to adjust its positioning. Your component can also manage when to display the Link component, passing the relevant companyCompany In Codat, a company represents your customer's business entity. Companies can have multiple connections to different data sources. ID and callbacks.
// AuthFlow.tsx

import {
  ConnectionCallbackArgs,
  ErrorCallbackArgs,
} from "@codat/sdk-link-types"
import { useState } from "react";
import { CodatLink } from "./components/CodatLink";

function App() {
  const [companyId, setCompanyId] = useState("");
  const [modalOpen, setModalOpen] = useState(false);
  const [isFinished, setIsFinished] = useState(false);

  const onConnection = (connection: ConnectionCallbackArgs) => {
    // Perform any logic here that should happen when a connection is linked
    console.log(`New connection linked with ID: ${connection.connectionId}`);
  }
  const onClose = () => setModalOpen(false);
  const onFinish = () => {
    onClose();
    setIsFinished(true);
  }
  const onError = (error: ErrorCallbackArgs) => {
    // this error should be logged in your error tracking service
    console.error(`Codat Link SDK error`, error);
    if (!error.userRecoverable) {
      onClose();
    }
  }

  return (
    <div>
      <p>Some content</p>

      <button onClick={() => setModalOpen(true)}>
           Start authing
      </button>

      {modalOpen && (
      <div className="modal-wrapper">
        <CodatLink
          companyId={companyId}
          onConnection={onConnection}
          onError={onError}
          onClose={onClose}
          onFinish={onFinish}
        />
      </div>
    )};
    </div>
  );
};
- Conditional steps
-
If you're using TypeScript, extend your type declarations with our types by installing the types package using
npm install --save-dev @codat/sdk-link-types. Otherwise, delete the type-related code in the snippets. -
If you're using content security policy (CSP) headers, edit these headers:
- Allowlist Codat by adding
*.codat.iotodefault-src(or each ofscript-src,style-src,font-src,connect-src,img-src). - Recommended: pass a CSP nonce via
options.nonceand addnonce-<value>tostyle-src. - Alternatively, add
unsafe-inlinetostyle-srcif you aren't using nonces. Do not use a hash because this can change at any time without warning.
- Allowlist Codat by adding
-
Get started with NextJS
For an example of the component in action, see our demo app.
NextJS is opinionated about the import strategy we're suggesting, and has an experimental feature called urlImports. If you follow our NextJS example, you'll be warned you need to use the urlImports feature.
LinkLink The authorization flow that allows end users to connect their accounting, banking, or commerce platforms to your application via Codat. SDK and urlImports are not compatible, because NextJS assumes the resources are static and caches the SDK, causing various issues.
In the example below, you'll see that we use webpack's magic comments feature to avoid NextJS's caching and use normal import() behavior.
-
Create a component that mounts the SDK
You can copy and paste the example
CodatLink.tsxfile to an appropriate location in your app. We recommend setting the component towidth: 460px; height: 840pxbecause it's optimized to look best with these parameters.We use
"use client"in the script to define this as client-side code, and the import is ignored in webpack to avoid NextJS caching (as above). -
Use the component to mount the SDK
We suggest wrapping the
CodatLinkcomponent in a modal to adjust its positioning. Your component can also manage when to display the Link component, passing the relevant companyCompany In Codat, a company represents your customer's business entity. Companies can have multiple connections to different data sources. ID and callbacks.
  // page.tsx

 "use client";

import {CodatLink} from "./components/CodatLink";
import Image from "next/image";
import styles from "./page.module.css";
import {useState} from "react";
import {
  ConnectionCallbackArgs,
  ErrorCallbackArgs,
} from "@codat/sdk-link-types";

export default function Home() {
  const [companyId, setCompanyId] = useState("");
  const [modalOpen, setModalOpen] = useState(false);
  const [isFinished, setIsFinished] = useState(false);

  const onConnection = (connection: ConnectionCallbackArgs) => {
    // Perform any logic here that should happen when a connection is linked
    console.log(`New connection linked with ID: ${connection.connectionId}`);
  }
  const onClose = () => setModalOpen(false);
  const onFinish = () => {
    onClose();
    setIsFinished(true);
  }
  const onError = (error: ErrorCallbackArgs) => {
    // this error should be logged in your error tracking service
    console.error(`Codat Link SDK error`, error);
    if (!error.userRecoverable) {
      onClose();
    }
  }

    return (
      <main className={styles.main}>
        // ... some other components
        {modalOpen && (
          <div className={styles.modalWrapper}>
            <CodatLink
              companyId={companyId}
              onConnection={onConnection}
              onError={onError}
              onClose={onClose}
              onFinish={onFinish}
            />
          </div>
        )}
      </main>
    );
  };
- Conditional steps
-
If you're using TypeScript, extend your type declarations with our types by installing the types package using
npm install --save-dev @codat/sdk-link-types. Otherwise, delete the type related code in the snippets. -
If you're using content security policy (CSP) headers, edit these headers:
- Allowlist Codat by adding
*.codat.iotodefault-src(or each ofscript-src,style-src,font-src,connect-src,img-src). - Recommended: pass a CSP nonce via
options.nonceand addnonce-<value>tostyle-src. - Alternatively, add
unsafe-inlinetostyle-srcif you aren't using nonces. Do not use a hash because this can change at any time without warning.
- Allowlist Codat by adding
-
Get started with JavaScript
For an example of the component in action, see our demo app.
-
Create a target
divfor theCodatLinkcomponentIt should have an
idofcodat-link-container.The
CodatLinkcomponent will be mounted within this div. We recommend settingwidth: 460px; height: 840pxfor this element and styling it as a modal by nesting it within a modal wrapper (e.g.position: fixed; inset: 0). The component is optimized to look best with these parameters.The created
CodatLinkcomponent expands to fit 100% of the specified dimensions. -
Import the LinkLink The authorization flow that allows end users to connect their accounting, banking, or commerce platforms to your application via Codat. SDK component
If you're using the component inside a
scripttag, the tag must havetype="module"set.
import { CodatLink } from "https://link-sdk.codat.io";
- Define callbacks
const closeCallback = () => {
  linkSdkTarget.style.pointerEvents = "none";
  linkSdkTarget.removeChild(linkSdkTarget.children[0]);
};

const onClose = () => closeCallback();

const onConnection = (connection) => {
  // Perform any logic here that should happen when a connection is linked
  console.log(`New connection linked with ID: ${connection.connectionId}`);
};

const onFinish = () => {
  onClose();
  toggleLinkCompletedDiv(true);
};

const onError = (error) => (error) => {
  // this error should be logged in your error tracking service
  console.error(`Codat Link SDK error`, error);
  if (!error.userRecoverable) {
    onClose();
  }
};
-
Initialize the LinkLink The authorization flow that allows end users to connect their accounting, banking, or commerce platforms to your application via Codat. SDK component in your app
Supply the
companyIdof the companyCompany In Codat, a company represents your customer's business entity. Companies can have multiple connections to different data sources. you want to authorize:
const target = document.querySelector("#codat-link-container");

const openModal = () => {
  linkSdkTarget.style.pointerEvents = "initial";
  new CodatLink({
    target: linkSdkTarget,
    props: {
      companyId,
      onConnection,
      onClose,
      onFinish,
      onError,
    },
  });
};
- Conditional steps
- If you're using TypeScript, extend your type declarations with our types. Download the
types.d.tsfile, then copy and paste its contents into a new or existing.d.tsfile. - If you're using content security policy (CSP) headers, edit these headers:
- Allowlist Codat by adding
*.codat.iotodefault-src(or each ofscript-src,style-src,font-src,connect-src,img-src). - Recommended: pass a CSP nonce via
options.nonceand addnonce-<value>tostyle-src. - Alternatively, add
unsafe-inlinetostyle-srcif you aren't using nonces. Do not use a hash because this can change at any time without warning.
- Allowlist Codat by adding
- If you're using TypeScript, extend your type declarations with our types. Download the
Get started with Angular
For an example of the component in action, see our demo app.
In the example below, we use webpack's magic comments feature to avoid Angular's caching and use normal import() behavior.
-
Create a component that mounts the SDK
See the
codat-link folderfor an example module. -
Define companyCompany In Codat, a company represents your customer's business entity. Companies can have multiple connections to different data sources. ID and callbacks
//app.component.ts

  openLink() {
    if (this.companyId) {
      this.linkOpen = true;
    }
  }

  closeLink() {
    this.linkOpen = false;
  }

  onConnection(connection: ConnectionCallbackArgs) {
    // Perform any logic here that should happen when a connection is linked
    console.log(`New connection linked with ID: ${connection.connectionId}`);
  }

  onError(error: ErrorCallbackArgs) {
    // this error should be logged in your error tracking service
    console.error(`Codat Link SDK error`, error);
    if (!error.userRecoverable) {
      this.closeLink();
    }
  }

  onFinish() {
    this.closeLink();
    this.linkFinished = true;
  }

  reset() {
    this.linkFinished = false;
    }
  }
- Use the component to mount the SDK
<!-- app.component.html -->

<button (click)="openLink()">Start authing</button>
<app-codat-link
  [companyId]="companyId"
  (connection)="onConnection($event)"
  (close)="closeLink()"
  (error)="onError($event)"
  (finish)="onFinish()"
  *ngIf="linkOpen"
></app-codat-link>
- Conditional steps
- If you're using TypeScript, extend your type declarations with our types. Download the
types.d.tsfile, then copy and paste its contents into a new or existing.d.tsfile. - If you're using content security policy (CSP) headers, edit these headers:
- Allowlist Codat by adding
*.codat.iotodefault-src(or each ofscript-src,style-src,font-src,connect-src,img-src). - Recommended: pass a CSP nonce via
options.nonceand addnonce-<value>tostyle-src. - Alternatively, add
unsafe-inlinetostyle-srcif you aren't using nonces. Do not use a hash because this can change at any time without warning.
- Allowlist Codat by adding
- If you're using TypeScript, extend your type declarations with our types. Download the
Get started with Vue
For an example of the component in action, see our demo app.
-
Create a component that mounts the SDK
You can copy and paste the example
CodatLink.vuefile to an appropriate location in your app. We recommend settingwidth: 460px; height: 840pxfor this component because it's optimized to look best with these parameters. -
Use this component to mount the SDK
We suggest wrapping the
CodatLinkcomponent in a modal to adjust its positioning. The component can also manage when to display the Link component, passing the relevant companyCompany In Codat, a company represents your customer's business entity. Companies can have multiple connections to different data sources. ID and callbacks.
// App.vue

<script setup lang="ts">
  import CodatLink from './components/CodatLink.vue'
  import { ref } from 'vue'
  import type { ConnectionCallbackArgs, ErrorCallbackArgs } from 'https://link-sdk.codat.io'

  const companyId = ref('')
  const modalOpen = ref(false)
  const isFinished = ref(false);

  const handleOnConnection = (connection: ConnectionCallbackArgs) => {
    // Perform any logic here that should happen when a connection is linked
    console.log(`New connection linked with ID: ${connection.connectionId}`);}

  const handleOnClose = () => {
    modalOpen.value = false
  }

  const handleOnFinish = () => {
    handleOnClose();
    isFinished.value = true;
  }

  const handleOnError = (error: ErrorCallbackArgs) => {
    // this error should be logged in your error tracking service
    console.error(`Codat Link SDK error`, error);
    if (!error.userRecoverable) {
      handleOnClose();
    }
  }
</script>

<div class="app">
  <main>
    <div v-if="modalOpen" class="modalWrapper">
      <CodatLink :company-id="companyId" :on-connection="handleOnConnection" :on-close="handleOnClose"
        :on-finish="handleOnFinish" :on-error="handleOnError" />
    </div>
  </main>
</div>
- Conditional steps
- If you're using TypeScript, extend your type declarations with our types. Download the
types.d.tsfile, then copy and paste its contents into a new or existing.d.tsfile. - If you're using content security policy (CSP) headers, edit these headers:
- Allowlist Codat by adding
*.codat.iotodefault-src(or each ofscript-src,style-src,font-src,connect-src,img-src). - Recommended: pass a CSP nonce via
options.nonceand addnonce-<value>tostyle-src. - Alternatively, add
unsafe-inlinetostyle-srcif you aren't using nonces. Do not use a hash because this can change at any time without warning.
- Allowlist Codat by adding
- If you're using TypeScript, extend your type declarations with our types. Download the
Get started with Svelte
For an example of the component in action, see our demo app.
-
Create a component that mounts the SDK
You can copy and paste the example
CodatLink.sveltefile to an appropriate location in your Svelte app. We recommend settingwidth: 460px; height: 840pxfor this component because it's optimized to look best with these parameters. -
Use the component to mount the SDK
We suggest wrapping the
CodatLinkcomponent in a modal to adjust its positioning. The component can also manage when to display the Link component, passing the relevant companyCompany In Codat, a company represents your customer's business entity. Companies can have multiple connections to different data sources. ID and callbacks.
// App.svelte

<script lang="ts">
  import CodatLink from "./lib/CodatLink.svelte";
  import type {
    ConnectionCallbackArgs,
    ErrorCallbackArgs,
  } from "https://link-sdk.codat.io";

  let modalOpen = false;
  let isFinished = false;
  let companyId = "";

  const onConnection = (connection: ConnectionCallbackArgs) => {
    // Perform any logic here that should happen when a connection is linked
    console.log(`New connection linked with ID: ${connection.connectionId}`);
  }
  const onClose = () => (modalOpen = false);
  const onFinish = () => {
    onClose();
    isFinished = true;
  }
  const onError = (error: ErrorCallbackArgs) => {
    // this error should be logged in your error tracking service
    console.error(`Codat Link SDK error`, error);
    if (!error.userRecoverable) {
      onClose();
    }
  }
</script>

<div class="app">
  <main>
      {#if modalOpen}
      <div class="modal-wrapper">
        <CodatLink {companyId} {onConnection} {onClose} {onError} {onFinish} />
      </div>
    {/if}
  </main>
</div>
- Conditional steps
- If you're using TypeScript, extend your type declarations with our types. Download the
types.d.tsfile, then copy and paste its contents into a new or existing.d.tsfile. - If you're using content security policy (CSP) headers, edit these headers:
- Allowlist Codat by adding
*.codat.iotodefault-src(or each ofscript-src,style-src,font-src,connect-src,img-src). - Recommended: pass a CSP nonce via
options.nonceand addnonce-<value>tostyle-src. - Alternatively, add
unsafe-inlinetostyle-srcif you aren't using nonces. Do not use a hash because this can change at any time without warning.
- Allowlist Codat by adding
- If you're using TypeScript, extend your type declarations with our types. Download the
Configure LinkLink The authorization flow that allows end users to connect their accounting, banking, or commerce platforms to your application via Codat. to match your current implementation:
- Choose your layout: Configure LinkLink The authorization flow that allows end users to connect their accounting, banking, or commerce platforms to your application via Codat. to display in modal or non-modal views to match your current UI.
- Preserve your consent flow: Use LinkLink The authorization flow that allows end users to connect their accounting, banking, or commerce platforms to your application via Codat.'s consent options or integrate with your existing consent pages.
- Match your branding: Apply your color scheme, logos, and styling using LinkLink The authorization flow that allows end users to connect their accounting, banking, or commerce platforms to your application via Codat.'s customization options.
LinkLink The authorization flow that allows end users to connect their accounting, banking, or commerce platforms to your application via Codat. SDK is imported at runtime, so you'll always get the latest version of our auth flow UI with no risk of staleness. To achieve this, we use ES6's import() feature (aka dynamic imports).
Step 4: Remove custom linkLink The authorization flow that allows end users to connect their accounting, banking, or commerce platforms to your application via Codat. logic and UI
- Remove your existing APIAPI A set of rules and protocols that allows different software applications to communicate with each other. Codat provides APIs for accessing financial data from accounting, banking, and commerce platforms. calls:
- If you use the platform key flow, remove the Create company calls.
- If you use the two-step flow, remove both Create company and Create connection calls.
- Remove UI elements that LinkLink The authorization flow that allows end users to connect their accounting, banking, or commerce platforms to your application via Codat. now handles:
- Custom integration selection interfaces.
- Any consent pages now managed by LinkLink The authorization flow that allows end users to connect their accounting, banking, or commerce platforms to your application via Codat..