Build webhook consumers to subscribe to events
Configure new webhook consumers in Codat and manage existing configuration to receive webhook events
Overview
A webhookWebhook An automated notification sent from Codat to your application when specific events occur, such as when data syncs complete or connections change status. consumer is your implementation of a POST endpoint that you built to receive Codat's webhooksWebhook An automated notification sent from Codat to your application when specific events occur, such as when data syncs complete or connections change status.. In general, you need one consumer per event type.
This consumer must return a 2XX (status code 200-299) response within 15 seconds of receiving the POST request. We recommend passing the event to an internal message queue so that you can process it in time.
Configure webhookWebhook An automated notification sent from Codat to your application when specific events occur, such as when data syncs complete or connections change status. consumer
Once you have built your webhookWebhook An automated notification sent from Codat to your application when specific events occur, such as when data syncs complete or connections change status. consumer, configure Codat to send events to this consumer. Navigate to Settings > WebhooksWebhook An automated notification sent from Codat to your application when specific events occur, such as when data syncs complete or connections change status. > Events > Configure consumer and click Add endpoint to create a new consumer.
If you are planning to create an application with more than 50 consumers, reach out to your Codat contact so that we can optimize the solution for your use case.
Add the endpoint URL that you want to receive the messages, an optional description, and choose the events that this endpoint should listen to. You must specify a least one event type per endpoint.
Browse our event catalog in the Portal or in our documentation to choose the event types that suit your use case.
You can create a webhookWebhook An automated notification sent from Codat to your application when specific events occur, such as when data syncs complete or connections change status. consumer programmatically using our Create webhook endpoint.
If your consumer endpoint is behind a firewall or NAT, you'll need to allow-list IP addresses 4.159.114.108 and 20.117.190.191.
Custom headers
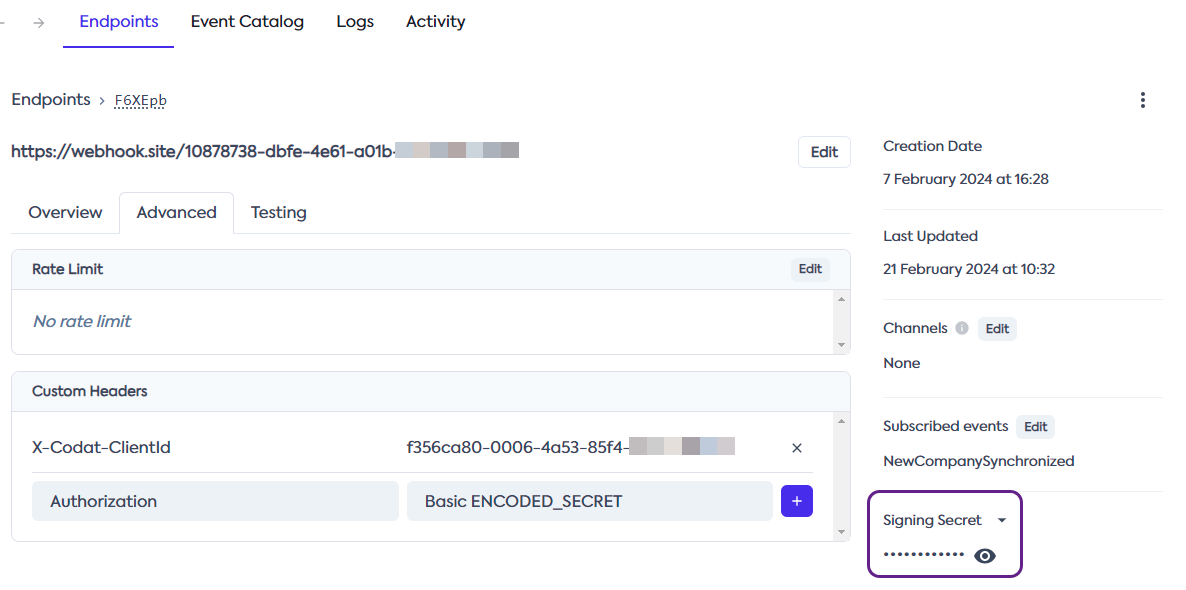
Once you created your webhookWebhook An automated notification sent from Codat to your application when specific events occur, such as when data syncs complete or connections change status. consumer, you can use its advanced functionality to add a custom header to the endpoint. This can be useful in the following scenarios:
-
If you are securing your webhookWebhook An automated notification sent from Codat to your application when specific events occur, such as when data syncs complete or connections change status. endpoints with an authorization header, you can add it as a custom
Authorizationheader. -
If you are using multiple Codat instances and need to differentiate between them, add a
X-Codat-ClientIdheader with the required client ID. You can find and copy your client ID in the Portal by clicking on your instance dropdown.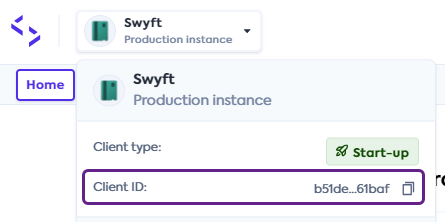
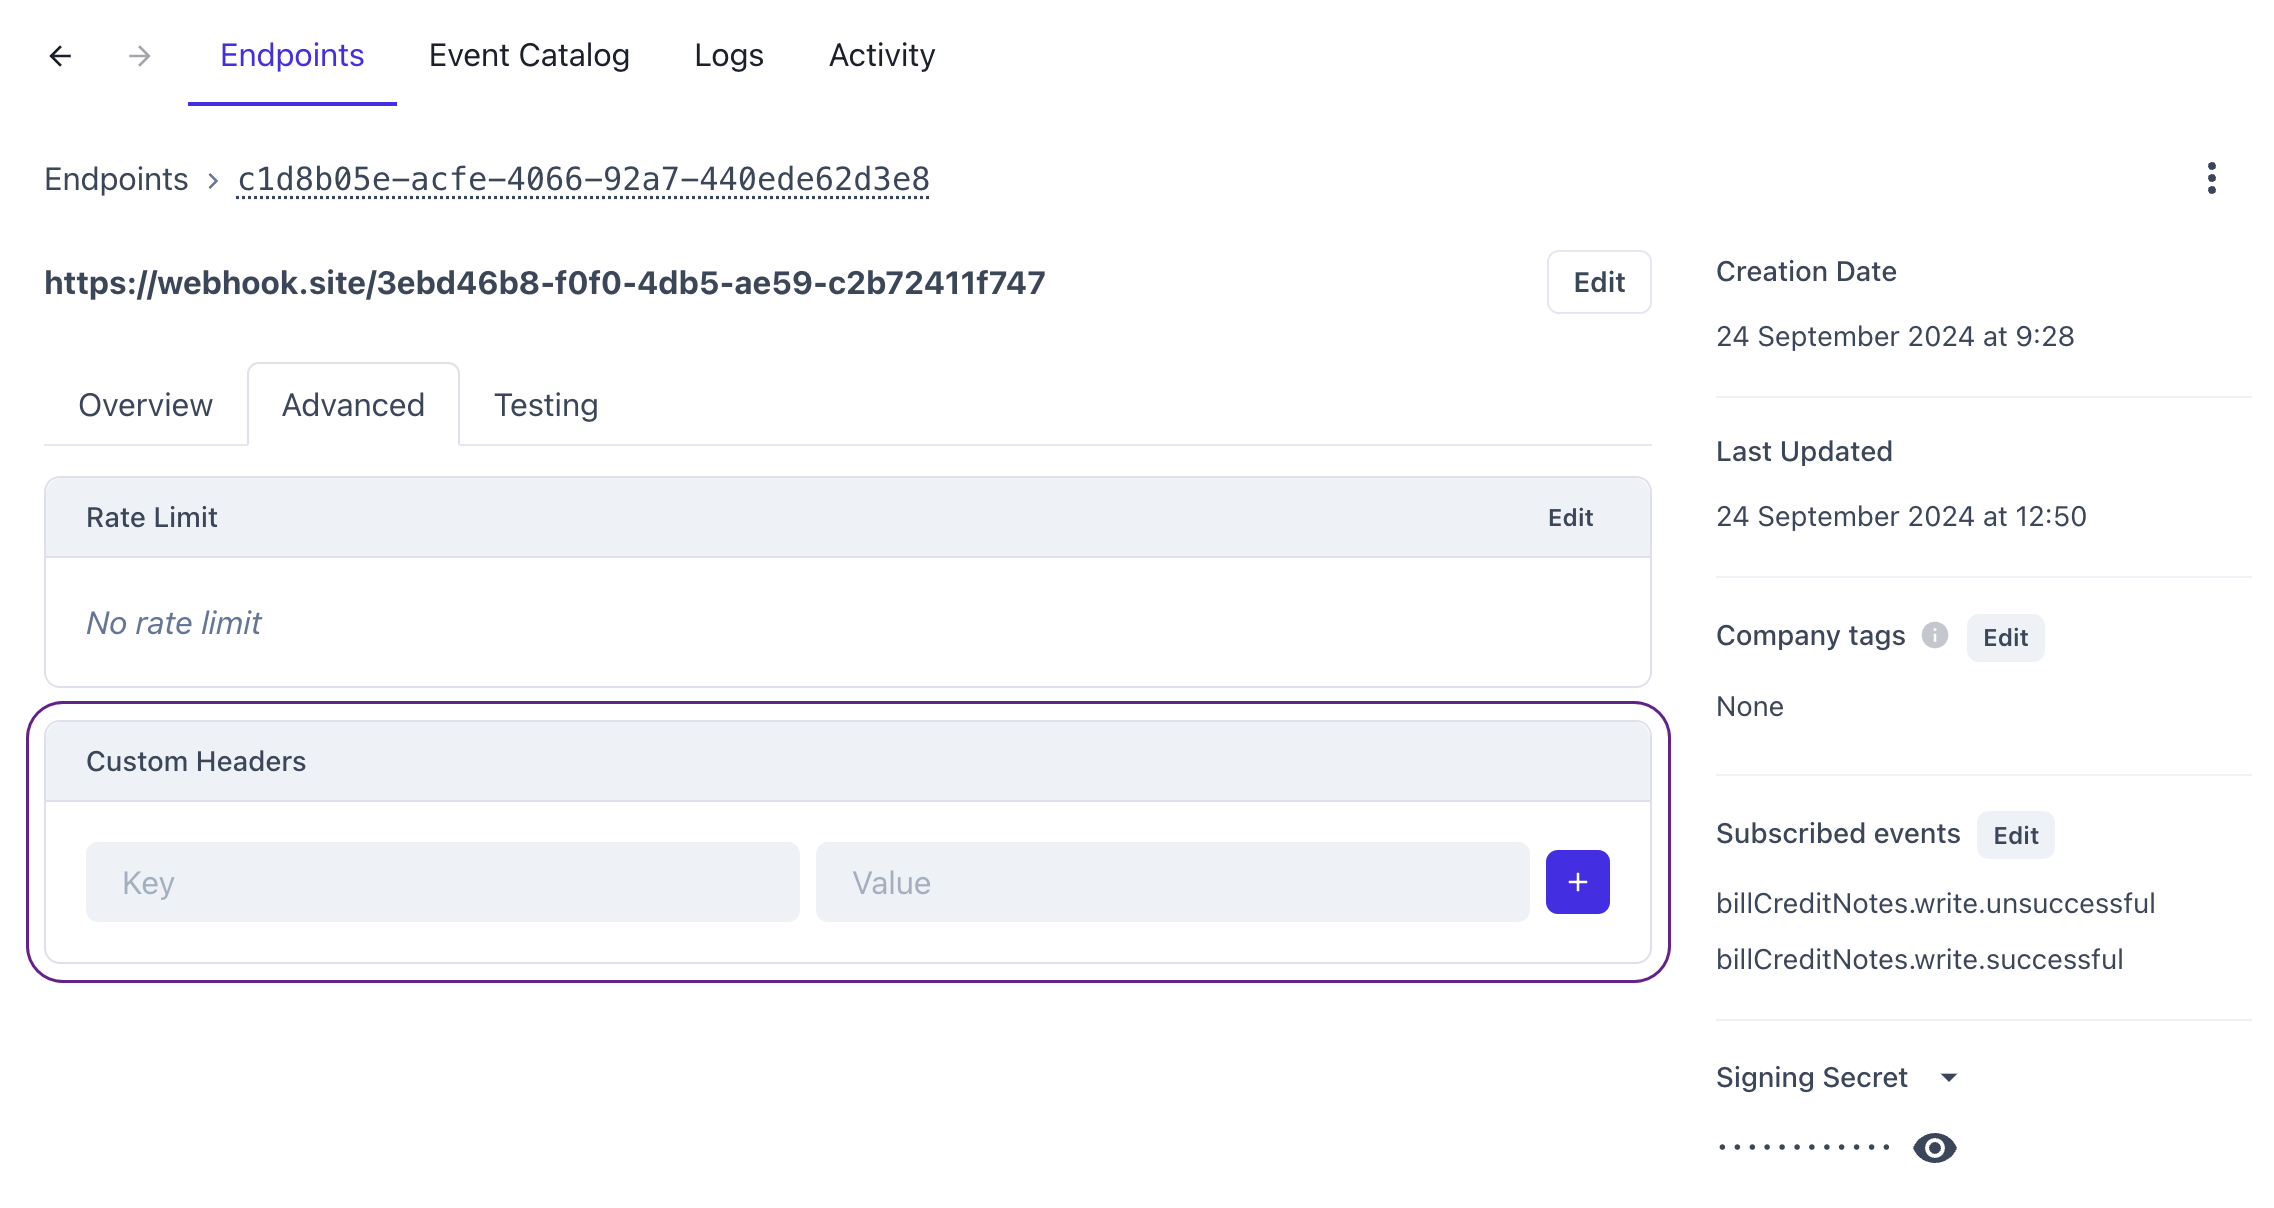
It's not possible to add a custom header via our APIAPI A set of rules and protocols that allows different software applications to communicate with each other. Codat provides APIs for accessing financial data from accounting, banking, and commerce platforms.. Instead, navigate to Monitor > WebhooksWebhook An automated notification sent from Codat to your application when specific events occur, such as when data syncs complete or connections change status. > Events and click on the relevant endpoint to see its detailed view. Then, select the Advanced tab and add your headers to the custom header section.
Filter webhooksWebhook An automated notification sent from Codat to your application when specific events occur, such as when data syncs complete or connections change status. by companyCompany In Codat, a company represents your customer's business entity. Companies can have multiple connections to different data sources. tags
You can configure a webhookWebhook An automated notification sent from Codat to your application when specific events occur, such as when data syncs complete or connections change status. consumer to filter companies based on tags you can add to a company profile. For example, if you want to receive webhooksWebhook An automated notification sent from Codat to your application when specific events occur, such as when data syncs complete or connections change status. only for companies tagged with a specific region or service, you can configure the consumer to match those tags.
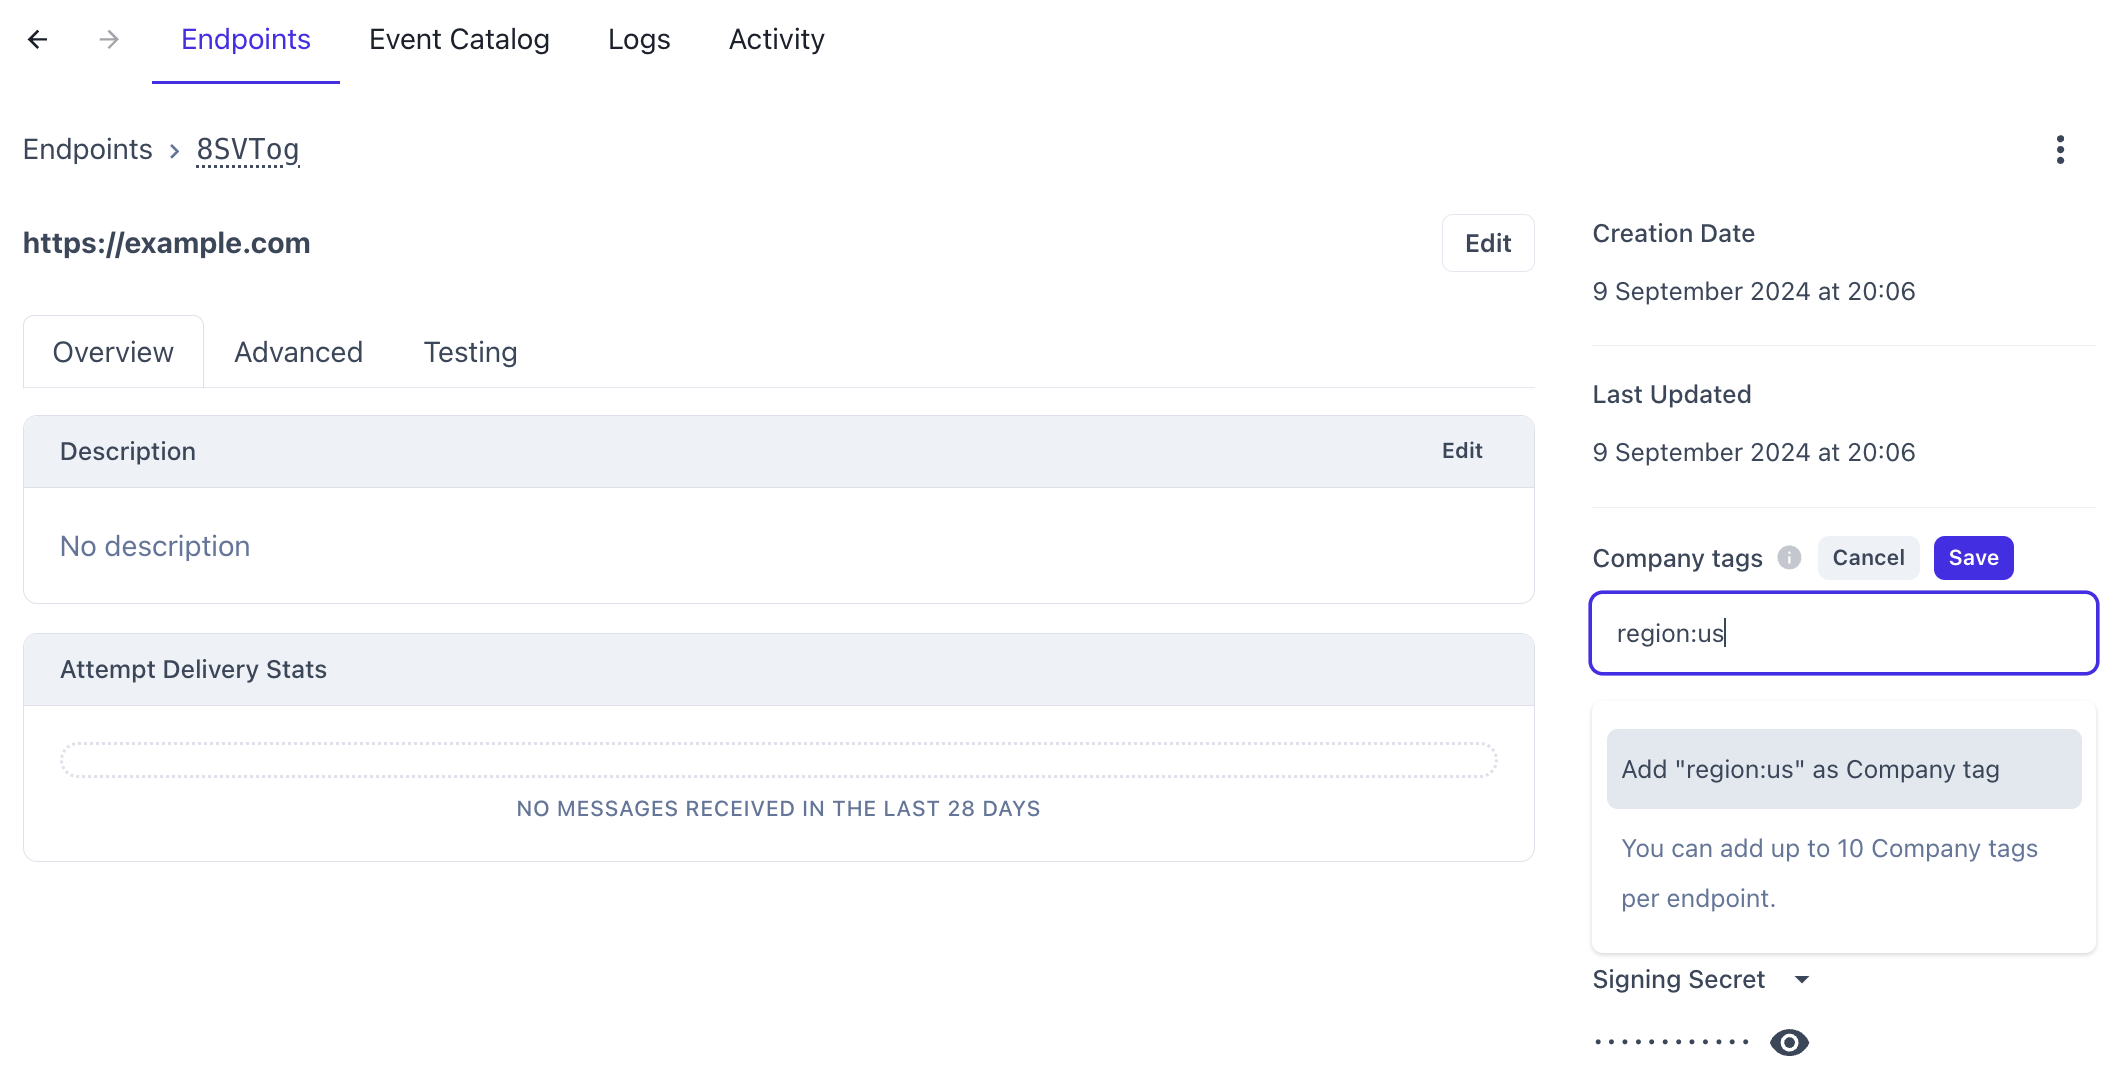
To set this up in the Codat Portal, navigate to Monitor > WebhooksWebhook An automated notification sent from Codat to your application when specific events occur, such as when data syncs complete or connections change status. > Events and select the relevant endpoint to view its details. Then, enter the tags you want to filter by in the CompanyCompany In Codat, a company represents your customer's business entity. Companies can have multiple connections to different data sources. tags field. Each webhookWebhook An automated notification sent from Codat to your application when specific events occur, such as when data syncs complete or connections change status. consumer can support up to 10 companyCompany In Codat, a company represents your customer's business entity. Companies can have multiple connections to different data sources. tags.
Tags must be formatted as key-value pairs separated by a colon. For example, to route webhooksWebhook An automated notification sent from Codat to your application when specific events occur, such as when data syncs complete or connections change status. for companies tagged with a region value of us, set the CompanyCompany In Codat, a company represents your customer's business entity. Companies can have multiple connections to different data sources. tags field to region:us. Any companyCompany In Codat, a company represents your customer's business entity. Companies can have multiple connections to different data sources. tagged with a region value of uk will be ignored.
A message will be delivered every time any of the companyCompany In Codat, a company represents your customer's business entity. Companies can have multiple connections to different data sources.’s tags match the tags specified in the webhookWebhook An automated notification sent from Codat to your application when specific events occur, such as when data syncs complete or connections change status. consumer. For example, a consumer configured with region:us and service:t2k will still receive messages from a companyCompany In Codat, a company represents your customer's business entity. Companies can have multiple connections to different data sources. tagged with region:us and service:minerva because one companyCompany In Codat, a company represents your customer's business entity. Companies can have multiple connections to different data sources. tag matches.
Endpoint rate limits
If your application can only handle a limited number of requests in a given time period, set a rate limit on the consumer endpoint to protect it from overloading. The rate limit is defined as a maximum number of messages per second to send to that endpoint.
After the limit is reached, the frequency of requests will be reduced not to exceed it. The actual rate of messages can sometimes be slightly above the enforced rate limit.
View webhookWebhook An automated notification sent from Codat to your application when specific events occur, such as when data syncs complete or connections change status. consumers
In the Codat Portal, navigate to Monitor > WebhooksWebhook An automated notification sent from Codat to your application when specific events occur, such as when data syncs complete or connections change status. > Events to see the list of all consumer endpoints you have configured.
Alternatively, you can use the List webhooks endpoint to return a list of all consumers that currently exist for your client.
Delete webhookWebhook An automated notification sent from Codat to your application when specific events occur, such as when data syncs complete or connections change status. consumers
In the Codat Portal, navigate to Monitor > WebhooksWebhook An automated notification sent from Codat to your application when specific events occur, such as when data syncs complete or connections change status. > Events to see the list of your webhookWebhook An automated notification sent from Codat to your application when specific events occur, such as when data syncs complete or connections change status. consumers. Click on the one you want to delete, then click on the triple-dot options menu and choose Delete.
Alternatively, you can use the Delete webhook endpoint to delete an existing webhookWebhook An automated notification sent from Codat to your application when specific events occur, such as when data syncs complete or connections change status. consumer. You need to provide its valid webhookId as a parameter.
Test a webhookWebhook An automated notification sent from Codat to your application when specific events occur, such as when data syncs complete or connections change status. consumer
When adding a webhookWebhook An automated notification sent from Codat to your application when specific events occur, such as when data syncs complete or connections change status. consumer endpoint, you may want to test it with an example event to confirm its configuration. Once you have created the endpoint, click on it to see the detailed view, and navigate to the Testing tab.
Next, choose the example event you want to send and click Send example. Once it's sent, you can click into the message to view its payload, attempts, and status.
There are many reasons a message to your endpoint could fail. Have a look at our troubleshooting guide to resolve the most common issues that occur.
WebhookWebhook An automated notification sent from Codat to your application when specific events occur, such as when data syncs complete or connections change status. security
Codat provides multiple options to secure your webhookWebhook An automated notification sent from Codat to your application when specific events occur, such as when data syncs complete or connections change status. consumers and ensure that only authorized systems receive and process webhookWebhook An automated notification sent from Codat to your application when specific events occur, such as when data syncs complete or connections change status. events securely. You can use:
- Custom headers to authenticate access to your consumer by including the
Authorizationheader in the request. - mutual TLS (mTLS) to verify both the server and client identities.
- Webhook signatures to verify that webhookWebhook An automated notification sent from Codat to your application when specific events occur, such as when data syncs complete or connections change status. messages were genuinely sent by Codat.
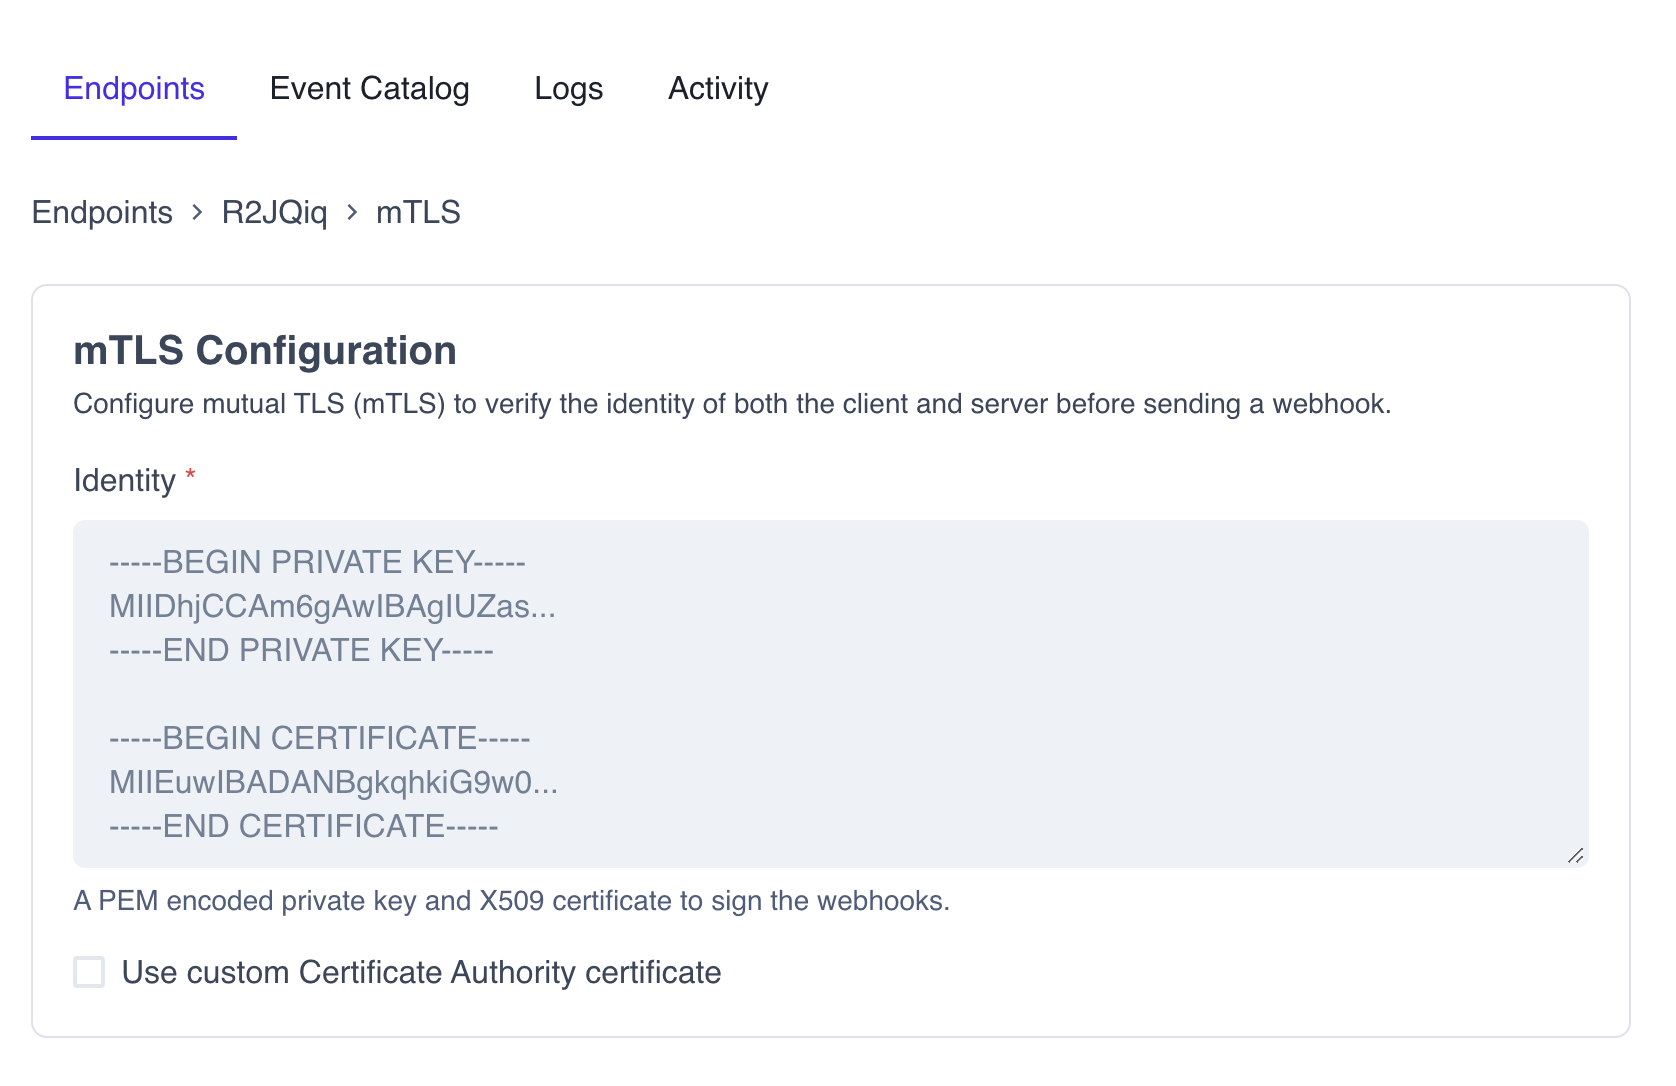
Configure mutual TLS
To configure mTLS in the Codat Portal, you need a PEM-encoded private key and an X.509 certificate.
Mutual TLS (mTLS) is an authentication protocol that ensures both the client and server verify each other’s identities before establishing a secure connectionConnection A link between a Codat company and a data source (like an accounting platform). Each connection represents authorized access to pull or push data from that platform.. Unlike standard TLS, which only authenticates the server, mTLS uses client certificates to enforce two-way authentication.
Follow the steps below to configure mTLS for a webhookWebhook An automated notification sent from Codat to your application when specific events occur, such as when data syncs complete or connections change status. consumer in Codat:
- Navigate to Monitor > WebhooksWebhook An automated notification sent from Codat to your application when specific events occur, such as when data syncs complete or connections change status. > Events in the Codat Portal to view your webhookWebhook An automated notification sent from Codat to your application when specific events occur, such as when data syncs complete or connections change status. consumers.
- Select the webhookWebhook An automated notification sent from Codat to your application when specific events occur, such as when data syncs complete or connections change status. consumer you want to configure mTLS for.
- In the detailed endpoint view, click Advanced, then Configure mTLS.
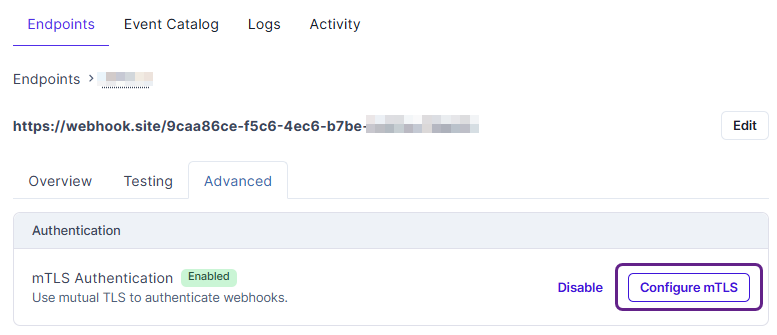
- In the displayed text box, enter your PEM-encoded private key and the X.509 certificate, separating them by a blank line.
- Click Save to apply the configuration.
Verify webhookWebhook An automated notification sent from Codat to your application when specific events occur, such as when data syncs complete or connections change status. signature
A webhookWebhook An automated notification sent from Codat to your application when specific events occur, such as when data syncs complete or connections change status. signature is your way to verify that the messages are sent by Codat and helps you avoid impersonation or replay attacks. We sign every webhookWebhook An automated notification sent from Codat to your application when specific events occur, such as when data syncs complete or connections change status. and its metadata with a unique security key for each endpoint and include timestamps for when the message attempt occurred.
You can use this signature to verify that the message truly came from Codat before processing it. To do the verification, we suggest using a library called Svix.
Install library
- JavaScript
- Python
- C#
- Go
- Rust
- Kotlin
- Ruby
- PHP
- CLI
pip install svix
dotnet add package Svix
go get github.com/svix/svix-webhooks/go
svix = "0"
Gradle
Add this dependency to your project's build file:
implementation "com.svix.kotlin:svix-kotlin:0.x.y"
Maven
Add this dependency to your project's POM:
<dependency>
  <groupId>com.svix.kotlin</groupId>
  <artifactId>svix-kotlin</artifactId>
  <version>0.x.y</version>
</dependency>
gem install svix
composer require svix/svix
Verify webhookWebhook An automated notification sent from Codat to your application when specific events occur, such as when data syncs complete or connections change status.
To verify incoming webhooksWebhook An automated notification sent from Codat to your application when specific events occur, such as when data syncs complete or connections change status., retrieve the secret key for your endpoint first.
In the Codat Portal, navigate to Monitor > WebhooksWebhook An automated notification sent from Codat to your application when specific events occur, such as when data syncs complete or connections change status. > Events, click the endpoint you want to verify, and copy the Signing secret from the endpoint's detailed view.
Next, you need to pass the secret key, request body, and headers to the verification library as demonstrated below.
You need to use the raw request body when verifying webhooksWebhook An automated notification sent from Codat to your application when specific events occur, such as when data syncs complete or connections change status. because the cryptographic signature is very sensitive to changes.
Watch out for frameworks that parse the request as JSON and then stringify it, because this will also break the signature verification.
- JavaScript
- Python
- C#
- Go
- Rust
- Kotlin
- Ruby
- PHP
- CLI
import { Webhook } from "svix";

const secret = "whsec_MfKQ9r8GKYqrTwjUPD8ILPZIo2LaLaSw";

// These were all sent from the server
const headers = {
  "webhook-id": "msg_p5jXN8AQM9LWM0D4loKWxJek",
  "webhook-timestamp": "1614265330",
  "webhook-signature": "v1,g0hM9SsE+OTPJTGt/tmIKtSyZlE3uFJELVlNIOLJ1OE=",
};
const payload = '{"test": 2432232314}';

const wh = new Webhook(secret);
// Throws on error, returns the verified content on success
const payloadAfterVerification = wh.verify(payload, headers);
from svix.webhooks import Webhook

secret = "whsec_MfKQ9r8GKYqrTwjUPD8ILPZIo2LaLaSw"

# These were all sent from the server
headers = {
  "webhook-id": "msg_p5jXN8AQM9LWM0D4loKWxJek",
  "webhook-timestamp": "1614265330",
  "webhook-signature": "v1,g0hM9SsE+OTPJTGt/tmIKtSyZlE3uFJELVlNIOLJ1OE=",
}
payload = '{"test": 2432232314}'

wh = Webhook(secret)
# Throws on error, returns the verified content on success
payload = wh.verify(payload, headers)
using Svix;
using System.Net;

// These were all sent from the server
var headers = new WebHeaderCollection();
headers.Set("webhook-id", "msg_p5jXN8AQM9LWM0D4loKWxJek");
headers.Set("webhook-timestamp", "1614265330");
headers.Set("webhook-signature", "v1,g0hM9SsE+OTPJTGt/tmIKtSyZlE3uFJELVlNIOLJ1OE=");
var payload = "{\"test\": 2432232314}";

var wh = new Webhook("whsec_MfKQ9r8GKYqrTwjUPD8ILPZIo2LaLaSw/Je4ZJEGP1QFb");

// Throws on error
wh.Verify(payload, headers);
import (
    svix "github.com/svix/svix-webhooks/go"
)

secret := "whsec_MfKQ9r8GKYqrTwjUPD8ILPZIo2LaLaSw"

// These were all sent from the server
headers := http.Header{}
headers.Set("webhook-id", "msg_p5jXN8AQM9LWM0D4loKWxJek")
headers.Set("webhook-timestamp", "1614265330")
headers.Set("webhook-signature", "v1,g0hM9SsE+OTPJTGt/tmIKtSyZlE3uFJELVlNIOLJ1OE=")

payload := []byte(`{"test": 2432232314}`)

wh, err := svix.NewWebhook(secret)
err := wh.Verify(payload, headers)
// returns nil on success, error otherwise
use svix::webhooks::Webhook;

let secret = "whsec_MfKQ9r8GKYqrTwjUPD8ILPZIo2LaLaSw".to_string();

let mut headers = http::header::HeaderMap::new();
headers.insert("webhook-id", "msg_p5jXN8AQM9LWM0D4loKWxJek");
headers.insert("webhook-timestamp", "1614265330");
headers.insert(
    "webhook-signature",
    "v1,g0hM9SsE+OTPJTGt/tmIKtSyZlE3uFJELVlNIOLJ1OE=",
);

let payload = b"{\"test\": 2432232314}";

let wh = Webhook::new(&secret)?;
wh.verify(&payload, &headers)?;
// returns Ok on success, Err otherwise
import com.svix.kotlin.Webhook

val secret = "whsec_MfKQ9r8GKYqrTwjUPD8ILPZIo2LaLaSw";

// These were all sent from the server
val headersMap = mapOf(
    "webhook-id" to listOf("msg_p5jXN8AQM9LWM0D4loKWxJek"),
    "webhook-timestamp" to listOf("1614265330"),
    "webhook-signature" to listOf("v1,g0hM9SsE+OTPJTGt/tmIKtSyZlE3uFJELVlNIOLJ1OE=")
)
val headers = HttpHeaders.of(headersMap) { _, _ -> true }

val payload = "{\"test\": 2432232314}";

val webhook = Webhook(secret);

webhook.verify(payload, headers)
// throws WebhookVerificationError exception on failure.
require 'svix'

# These were all sent from the server
headers = {
  "webhook-id" => "msg_p5jXN8AQM9LWM0D4loKWxJek",
  "webhook-timestamp" => "1614265330",
  "webhook-signature" => "v1,g0hM9SsE+OTPJTGt/tmIKtSyZlE3uFJELVlNIOLJ1OE="
}
payload = '{"test": 2432232314}'

wh = Svix::Webhook.new("whsec_MfKQ9r8GKYqrTwjUPD8ILPZIo2LaLaSw")
# Raises on error, returns the verified content on success
json = wh.verify(payload, headers)
// import using composers autoload
require_once('vendor/autoload.php');
// or manually
require_once('/path/to/svix/php/init.php');

// These were all sent from the server
$payload = '{"test": 2432232314}';
$header = array(
        'webhook-id'  => 'msg_p5jXN8AQM9LWM0D4loKWxJek',
        'webhook-timestamp' => '1614265330',
        'webhook-signature' => 'v1,g0hM9SsE+OTPJTGt/tmIKtSyZlE3uFJELVlNIOLJ1OE=',
    );

// Throws on error, returns the verified content on success
$wh = new \Svix\Webhook('whsec_MfKQ9r8GKYqrTwjUPD8ILPZIo2LaLaSw');
$json = $wh->verify($payload, $header);
export SVIX_AUTH_TOKEN="AUTH_TOKEN"
svix verify --secret whsec_MfKQ9r8GKYqrTwjUPD8ILPZIo2LaLaSw --msg-id msg_p5jXN8AQM9LWM0D4loKWxJek --timestamp 1614265330 --signature v1,g0hM9SsE+OTPJTGt/tmIKtSyZlE3uFJELVlNIOLJ1OE= '{"test": 2432232314}'
Transform webhookWebhook An automated notification sent from Codat to your application when specific events occur, such as when data syncs complete or connections change status. properties
You may want to modify a webhookWebhook An automated notification sent from Codat to your application when specific events occur, such as when data syncs complete or connections change status.'s properties (e.g. HTTP method, target URL, and message schema) before it is sent to your application to better fit your needs. To do so, you can now apply a transformation to the webhookWebhook An automated notification sent from Codat to your application when specific events occur, such as when data syncs complete or connections change status. following these steps:
- Go to Monitor > WebhooksWebhook An automated notification sent from Codat to your application when specific events occur, such as when data syncs complete or connections change status. > Events in the Codat Portal.
- Select the endpoint where you want to apply a transformation.
- In the detailed endpoint view, click Advanced, then Edit transformations.
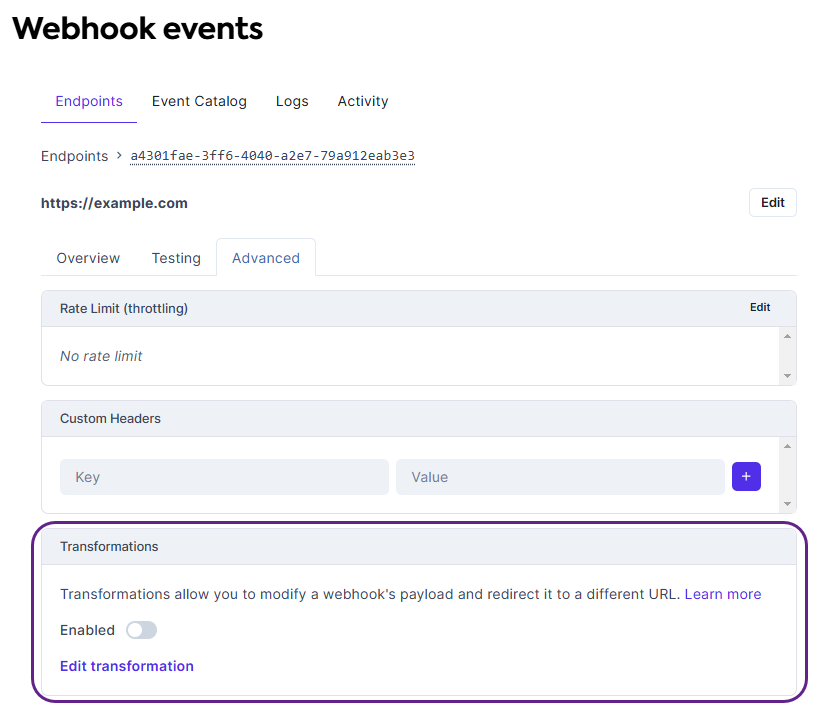
- In the displayed code block, add changes to the webhookWebhook An automated notification sent from Codat to your application when specific events occur, such as when data syncs complete or connections change status. properties as required, returning the
webhookobject at the end.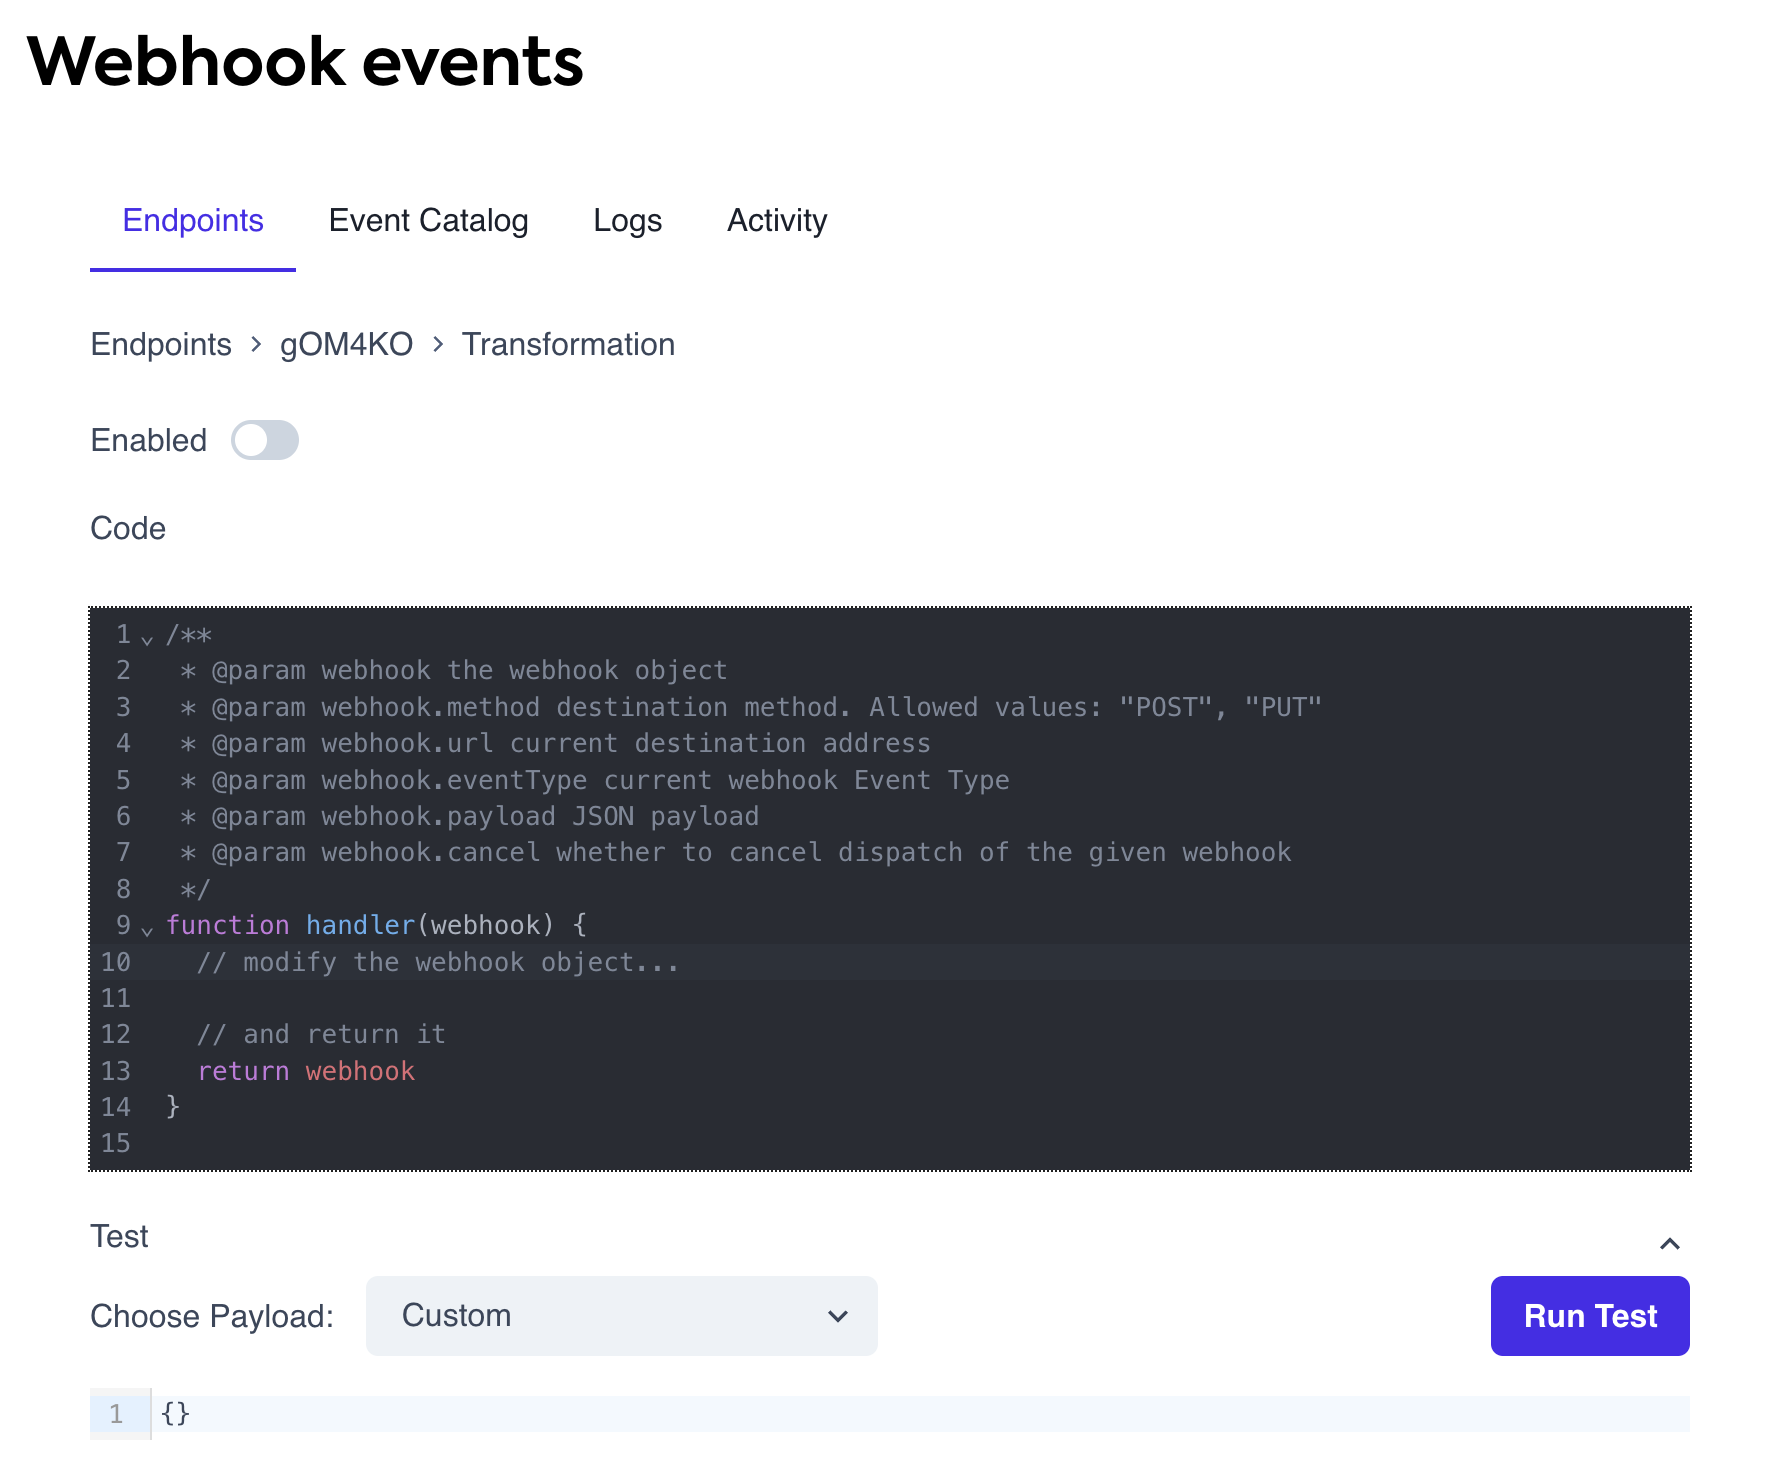
- Click Save and toggle the Enabled flag to apply the transformation.
WebhookWebhook An automated notification sent from Codat to your application when specific events occur, such as when data syncs complete or connections change status. object properties
The following are the properties of the webhook object that you can transform to fit your needs:
| Property | Type | Description |
|---|---|---|
method | string | The HTTP method used to communicate with your application. Codat supports only POST (default) or PUT methods. |
url | string | The endpoint URL where the message will be sent. |
payload | object | A JSON object representing the full webhookWebhook An automated notification sent from Codat to your application when specific events occur, such as when data syncs complete or connections change status. event schema. This is the complete event schema for each event type, not just the payload component of Codat’s schemas. You can modify it as needed. |
cancel | bool | Determines whether to cancel the webhookWebhook An automated notification sent from Codat to your application when specific events occur, such as when data syncs complete or connections change status. dispatch. Defaults to false. Canceled messages appear as successful dispatches in logs. |
Example: cancel requests using companyCompany In Codat, a company represents your customer's business entity. Companies can have multiple connections to different data sources. tags
You may want to prevent webhookWebhook An automated notification sent from Codat to your application when specific events occur, such as when data syncs complete or connections change status. notifications for specific groups of companies due to compliance reasons or business rules. Using company tags, you can tag companies and cancel webhookWebhook An automated notification sent from Codat to your application when specific events occur, such as when data syncs complete or connections change status. events for those with a specific tag using transformations.
In this example, webhooksWebhook An automated notification sent from Codat to your application when specific events occur, such as when data syncs complete or connections change status. are canceled for companies with the tag us-compliant set to true.
function handler(webhook) {
  if (webhook.payload.payload.referenceCompany.tags === undefined) {
    return webhook;
  }

  if (
    webhook.payload.payload.referenceCompany.tags["us-compliant"] === "true"
  ) {
    webhook.cancel = true;
  }

  // and return it
  return webhook;
}